If you’re having trouble keeping the bed of your Ender 3 (Pro or V2) leveled, or if you’re just learning about 3D printing and can’t get the damn thing leveled properly and the filament isn’t sticking to it, then this guide is definitely for you.
In this article, I will go over how to fix certain issues that might cause some problems with the bed not allowing you to level it properly (X Axis sag, bed wobble, etc.), how to level the bed, how to deal with a warped bed, which is very common with the Ender 3’s, and some recommendations on how to make this whole process easier.
If you don’t want to have to go through all the trial and error that we did in order to find the Ideal Settings for creating high-quality prints on your Ender 3, then definitely check out our own Cura Profiles tailored specifically for the Ender 3 Printer Series.
So, without further ado, let’s get started!
What does Leveling a 3D Printer bed mean?
Leveling the bed consists of adjusting the distance between the nozzle and the bed across the entirety of the build surface equally so that the nozzle is always at the same distance of the bed, allowing the first layer to be printed in a consistent way.
I’ve seen so many people getting confused by this since they seem to think that the bed itself needs to be leveled and they use a level tool only to find out that they can’t print anything when doing this.
Leveling the bed simply means that the bed and the nozzle will be at the same distance across the entire bed surface, and this is to ensure that the first layer gets printed properly and not too close or too far from the bed.
Fix Issues which might cause the Bed to not stay leveled

When I first assembled my Ender 3 Pro, I didn’t do that great of a job at making sure that everything was squared properly, especially the Z Axis which was slightly rotated and caused my X Axis to sag at times making it really difficult to get the bed leveled properly since sometimes it would sag while some other times it wouldn’t.
There are a lot of other problems that might be causing the bed not to stay leveled or that can mess with the bed itself causing it to wobble, to be higher on one side, etc.
I wrote an entire guide on how to fix all of these issues and more that you definitely should check out if you think you might be either having a wobbly bed, a bed that is higher on one side or if the screws that hold the bed are turning in place not allowing you to change its height properly.
Here’s the guide: How to fix Ender 3 Bed Leveling issues.
Now, with that out of the way, let’s see how to level the bed.
How to Level the bed of an Ender 3
If you’ve never used a 3D printer, then leveling the bed will be the hardest part to get right about the entire process. However, once you get a feel for it, you’ll be able to do it quickly and reliably, assuming there are no other issues going on, like the ones I mentioned previously.
Important note: The bed should always be heated up before leveling it since the heat will make it expand. If you level it cold, once it heats up before the printing process begins, it will expand and get closer to the nozzle and affect the height you set it at.
So, always preheat the bed to the temperature it’s going to be at during the entire printing process before leveling it, and remember that different materials require different bed temperatures, so keep that in mind and re-level the bed every time the bed temperature changes. (Example: 60°C for PLA, 110°C for ABS, etc.).
Here are the steps to leveling the Bed of your Ender 3:
- Rotate the adjustment wheels all the way counter-clockwise and lower the bed as much as possible.

- Press on the knob near the display (This will activate the menu) and go to “Prepare”, then “Preheat PLA” and on the next menu click on “Preheat PLA”. This will preheat the bed and the nozzle to print with PLA.

Note: Bed temperature depends on the material you’ll be printing with, so set the temperature accordingly and then level the bed.
- Home the Printer by going to “Prepare” in the menu and then click on “Auto Home”.

- In the menu go to “Prepare” and then click on “Disable Steppers”. This will disable the stepper motors allowing you to move the hotend and the bed freely.

- By moving the bed as well as the hotend, place the nozzle right above the leveling screw on the front-left of the printer.

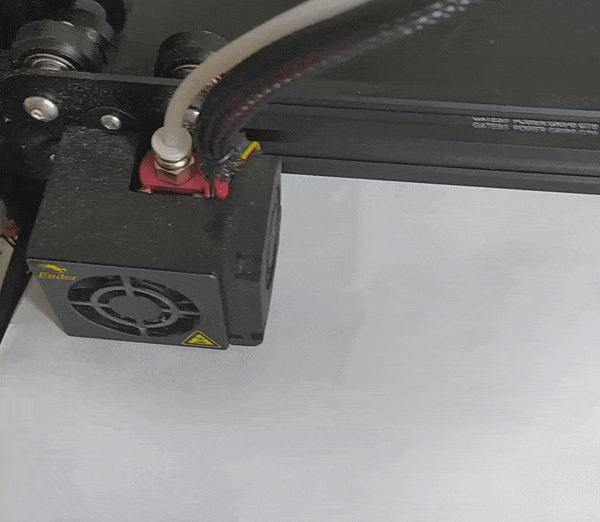
- Using a piece of regular paper, place it on the bed and underneath a nozzle. Some people prefer to use a folder piece of paper, I just use a regular sheet.
- Turn the adjustment wheel clockwise and meanwhile move the paper back and forth under the nozzle until it’s tight enough that you can feel it slightly gripping the paper but not so tight that it keeps the paper stuck in place.

Important Note: Adjusting the other three leveling screws will affect the first one, and since the other three corners of the bed are really low because I told you to tighten the adjustment wheels, if we raise all of them then the first spot I had you level will end up way too close to the nozzle.
So, we need to take this into account and again turn the adjustment wheel clockwise for 1/4th of a turn on that first corner of the bed.
- Slide the hotend to the right and place it right on top of the screw on the right corner and do the same thing; Place the piece of paper between the bed and the nozzle and turn the wheel counter-clockwise while moving the paper until you feel it gripping slightly.

- Do the same thing for the other two corners on the back on the bed, always right on top of the screws.
- Now it’s time to do some fine tuning: Go back to the first corner and place the piece of paper between the nozzle and the bed and rotate the adjustment wheel slightly (max 1/4th of a turn) until you feel a slight grip on the paper.
- Repeat this last part on all four corners two or three more times at least until the bed is properly leveled.
Important note: If this happens, then you tightened the screws too much and need to rotate them counter-clockwise a little.
Common Ender 3 Bed issue (Warped Bed) and how to work around it
I’m sad to say that most Ender 3’s don’t ship with a completely flat bed but rather with one that is generally warped in the middle, and this can cause all kinds of problems because leveling the bed by using the method I just described, going around the corners only, will leave the center of the bed a lot lower than the outer portion.
Luckily, there are a multitude of fixes for this, two of which are 100% free and the other ones are fairly affordable also.
Level the bed only in the “Printing Area”

What I mean by this is to not level the bed right on top of the bed screws, but rather imagine a smaller square near the center of the bed where the object is actually going to be printed and to use that small space to level the bed and to make sure that the distance between the nozzle and the bed is set properly for a good first layer in that section.
What I generally do is level the bed by following the steps I previously mentioned, but I then move the nozzle closer to the center of the bed and do the same “fine tuning” steps all over again but only in a smaller area.
This is not an ideal fix since it will only work when printing small objects that won’t take up much of the bed’s surface.
If you want to print something larger, then this method might not work for you since the first layer might get squished on the outer parts of the bed but not be close enough in the center.
Manual Mesh Bed Leveling
This one’s a bit more complicated and not really recommended for absolute beginners since it requires you to change some things in the firmware.
Essentially, what mesh bed leveling does is create a mesh model of your bed, lowering or raising the nozzle while printing the first layer to compensate for an uneven bed surface.
Like I mentioned, this one’s a bit more complicated but here’s a guide on how to do it.
Use a Glass Bed
To be honest, I didn’t want to ditch my magnetic bed and install the glass one, but I had to because of how warped the bed on my Ender 3 Pro is.
A glass bed is thick and won’t just follow the shape of the bed if it’s warped, which means that now you’ll have a flat, or at least fairly flat surface to print on.
The one important thing I want to mention is that installing a glass bed means that your build surface is now a couple mm higher and you will need to adjust the Z offset by manually moving the Limit Switch Plate up a couple mm as well.
I have an entire guide on how to do it that you can find here: Ender 3 Z Offset; How to adjust it.
Since I installed the glass bed, printing has become a lot easier since I’m now printing on top of a flatter surface. So, try it out!
Oh, just note that going with a glass bed will make the removal of prints a lot harder and you’ll probably need to let the bed cool down before even attempting to remove them.
Install a bed Leveling Sensor

Installing an automatic bed leveling sensor, like the BLTouch, will make it so that your Ender 3 will check the distance between the nozzle and the bed at multiple locations and use that information to set the distance accordingly throughout the entire build surface.
If you ever decide to go this route, you’ll never have to manually level the bed again and won’t have nearly as many failed prints as before.
I wrote an entire post about bed leveling sensors that you should definitely check out since I go over all the different types of sensors that there are, which one is better, etc.
How To make the Bed Leveling Process easier

Bed leveling on an Ender 3 can be really tedious, but there are a couple things you can do to make it easier:
Change the Springs on the Leveling screws: The sprints that come stock with the Ender 3 aren’t really that stiff and this means that they will have a harder time keeping the bed properly in place for long periods of time.
You can get these yellow springs and simply replace the old ones with them. In my case, once I installed the new ones, I went from leveling the bed every three or four prints to now leveling it every 20 prints or more, and the fix was so simple!
Install an ABL: I just briefly mentioned automatic bed leveling, but if you truly don’t ever want to have to think about leveling the bed on your 3D printer again, then get one. The BLTouch is generally the best one for a printer such as the Ender 3.
If you don’t want to have to go through all the trial and error that we did in order to find the Ideal Settings for creating high-quality prints on your Ender 3, then definitely check out our own Cura Profiles tailored specifically for the Ender 3 Printer Series.
Conclusion
If you already checked that your Ender 3 isn’t suffering from a wobbly bed, or any of the other issues I described earlier, then I’d highly recommend changing the springs underneath the bed since these will keep it leveled for much longer.
Of course, when you remove a print try to do it as gently as you can, otherwise you may throw the entire bed level out of whack if you do it too strongly.
Whenever I have to relevel the bed, I generally do it on the corners and then move closer to the center, since this allows me to adjust the distance between the nozzle and the bed where the object is actually being printed, and that’s how I’d recommend you do it as well!
Of course, the absolute best solution would be to get an Automatic Bed Leveling sensor and to just forget about leveling the bed.
I hope this information was useful!
Have a great day!
Check out our recommended products section

We created a recommended products section that will allow you to remove the guesswork and reduce the time spent researching what printer, filament, or upgrades to get, since we know that this can be a very daunting task and which generally leads to a lot of confusion.
We have selected just a handful of 3D printers that we consider to be good for beginners as well as intermediates, and even experts, making the decision easier, and the filaments, as well as the upgrades listed, were all tested by us and carefully selected, so you know that whichever one you choose will work as intended.
Error processing API data.
Thank you this information was very helpful to me. I am now convinced that I have to get an auto bed leveler sensor. Lol! However this was still a very informative and helpful article.