During the regular and normal use of a 3D printer, there is a wide variety of problems that can appear. Some of them will just delay our job for a few minutes, while others can render our machine completely useless until we are able to solve the issue.
A common and annoying issue is when our printer suddenly stops extruding mid-print. After yelling and crying for a reasonable amount of time, we may proceed to ask ourselves: what’s is causing this problem and how can we solve it?
The most common issues that cause a printer to stop extruding filament in mid-print are a clogged extruder or an overheated extruder motor drive. The extruder could be clogged due to poor calibration, incorrect printing temperature, poor quality of the filament, or the presence of dust and dirt in the vicinity of the printer.
You can unclog the extruder with an acupuncture needle or a guitar string, or by performing a cold pull. In the case of an overheated extrusion motor driver, the solution relies on cooling the component with an always-on fan or by replacing the part with a new one.
We will go into further detail, discuss each cause, how to troubleshoot appropriately, how to solve it, and finally, how to reduce prevent this from happening again.
What causes the extruder to stop in mid-print?
Out of filament
It may seem obvious, but always check that this is not the case before starting to troubleshoot. If the spool has run out, you will need to start up with a new spool before resuming the print.
If you are new to 3D printing, I would recommend you to check the slicer’s estimate of the amount of filament that your model will consume before you start printing any object.
Another way to avoid this problem is to install a filament runout sensor that will pause the printing job and allow you to load a new filament spool without needing to stop the printing completely. The good news is that more and more 3D printer manufacturers are including this feature by default.
It may also be the case that the filament spool got tangled. This can be due to a manufacturing issue but is more probably caused by us. To prevent this from happening you must maintain the filament tension and not let the end of the filament lose when you store it.
Clogged extruder

Now that you know that your machine has not run out of filament, let’s start with the real troubleshooting! Let’s start by checking the things that may lead to a clogged nozzle.
Incorrect nozzle height or poor calibration
This problem is very common, and lucky for us, it is also very easy to fix. If your extruder doesn’t start extruding plastic when the print starts it may be due to an incorrect nozzle height (bed not leveled properly and the nozzle is digging into it).
If the nozzle is too low, there is not enough space between the nozzle tip and the build plate surface. This leads to the nozzle being blocked by the build plate, and thus the filament won’t be able to flow smoothly.
You will notice this problem when the filament does not extrude onto the first or even the second layer, but from the third or fourth layer, the extrusion should be normal. If your extruder stops depositing filament on the successive layers, it is almost definitely not caused by this.
The solution for this problem is to calibrate your 3D printer (Bed Levelling) so that the space between the nozzle and the printing surface is enough (between 0.1mm and 0.2mm for 0.4 mm nozzle) to guarantee a normal filament extrusion. As a rule of thumb, you should be able to place a piece of paper between the nozzle and the build plate.
Incorrect printing temperature
When using PLA plastic, the optimum extrusion temperature can range from as low as 180°C up to 220°C. Attempting to print at too low of a temperature will most likely result in no extrusion at all, and printing at unnecessarily high temperatures can, counterintuitively, be even worse.
In fact, if you are trying to print at a temperature that is too high for a given material, your filament may simply vitrify in the extruder and therefore clog it.
In a nutshell, I advise to always check the optimal temperature recommended by the filament manufacturer. They can usually be found somewhere on the packaging or even on the spool itself.
On the off chance that you do not find it there, you can always google the brand and pray that someone found the ideal temperature. Not finding this simple parameter easily is also an indication that your filament is, to state it politely, sub-optimal.
Poor quality filament
As we mentioned above, bad factory practices can result in a high probability of issues arising during a print. It means that filaments with a larger diameter or with an inconsistent and imperfect width along the spool can cause problems during the printing process.
A poor quality filament and involuntary contaminants lurking inside the material can accumulate and clog directly inside the nozzle at random intervals.
The main determinants of a filament’s quality are the raw materials used to make the filament, the production line technology, and the control processes that the manufacturer puts in place. It’s rather important to use a quality tested material from a reliable brand. Always check for reviews and opinions before buying a new brand.
However, if you want an affordable and high-quality spool of PLA, get this one from Amazon since it works great.
Dust or dirt in the room
If your printer is placed in a room that is not properly cleaned, dust and dirt can interfere with the operation of the machine. If dust somehow gets into the extruder, it will get carbonized. As time goes by, more dirt will accumulate inside the nozzle. It will impede the correct flow of the material and lead to poor quality prints. Eventually, it may even clog the extruder.
Overheated extruder motor driver
When the extruder motor driver is overheated, it may skip some random steps which may also lead to a clogged nozzle. The first sign of overheating is erratic stepping motor behavior. Typically, this can be recognized by the sounds of the stepper motor suddenly losing power.
It can even result in a thermal shutdown. If this is the case, the extruder motor will not move at all.
If this happens to your printer, you should most definitely turn off the machine and allow the electronics to cool down before trying to print again. To prevent this from happening again, I recommend cooling the printer board with the fan always on.
This could also be caused by a faulty component, in which case I would not recommend you to tinker with solutions unless you really know what you are doing.
Fixing a clogged extruder
The fact that heated filament can smoothly go through a 0.4mm hole and only fail on rare events still amazes me. Regardless of my propensity to be astounded, let’s see how we can fix a clogged nozzle when our machine requires it!
There are multiple ways to fix a clogged nozzle. Some will fix the issue temporarily while others should serve as a more definitive solution. Let’s go through each one of them!
Manually push the filament into the extruder

Source: Whadda
The easiest way to fix a clogged nozzle is by manually pushing the filament into the extruder. Before doing so, make sure that the hot end is fully heated. Squeeze the extruder arm to compress the spring, push the filament through (not too hard) and verify that it comes out through the nozzle.
This solution may fix your issue, but it won’t guarantee that all residue got extruded out of the nozzle. You could still have some residues inside the nozzle that can lead to an uneven flow of filament, so keep an eye on the quality of the first layers after doing this.
Unclog with a guitar string or an acupuncture wire
To solve de clogged extruder without disassembling the hot-end you can try to clean the nozzle with a stainless steel needle, a fine wire, or even with a guitar string.
The procedure to follow is rather simple:
- Step 1: Heat the hotend to the extrusion temperature of the material that caused the clogging.
- Step 2: Insert the needle/wire/string through the nozzle between 10mm and 30mm deep (a few times).
- Step 3: If a continuous flow is not obtained, repeat the whole process again.
Atomic Method / Cold Pull
If the needle method didn’t work, try the cold pull. For this method, you will need a filament with good thermal resistance such as ABS or Nylon filament.
- Step 1: Heat the nozzle to 220°C (If you just printed with PLA).
- Step 2: Insert a piece of white or light-colored Abs, Nylon, or any strong filament with good thermal resistance.
- Step 3: Push it manually as hard as possible.
- Step 4: Observe if the filament flowing through the nozzle (if the obstruction is total, it may not extrude anything).
- Step 5: Let the printer cool down to around 90°C for PLA and 160°C for ABS. Keep the pressure during cooling.
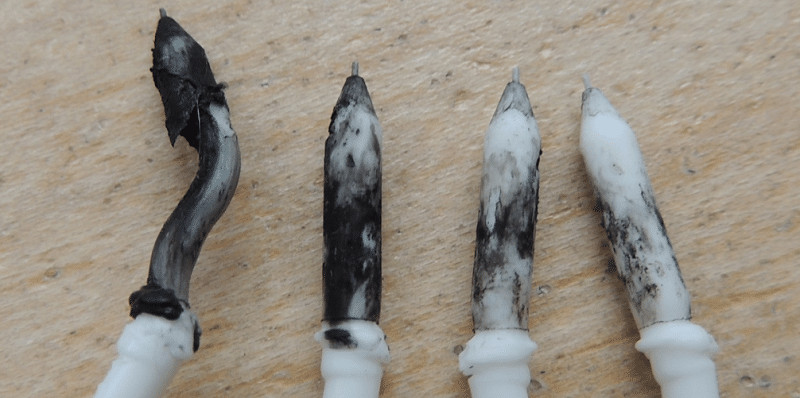
- Step 6: When the printer reaches the lowest temperature mentioned in step 5, remove the filament quickly and forcefully from the hotend and inspect the semi-fused part of the filament. This must have a little bit of dirt (black spots). Those black spots were causing the blockage.
- Step 7: Cut the dirty part of the filament and repeat from step 2 until the filament comes out clean.
Source: rigid.ink
Deep Cleaning
This method involves disassembling the nozzle at the higher temperature our extruder can reach. Heat the nozzle using a torch, a heat gun, or even the house stove. Eliminate all of the plastic inside and outside of the nozzle.
To check if cleaning really worked, aim the nozzle towards a light source and try to look through the hole. If you see a nice and round circle of light, it means you have cleaned your nozzle. To further clean the nozzle, you can dip your nozzle in acetone (for ABS) or caustic soda (PLA) and let it sit for a night.
How to prevent this from happening again
By now you should be the proud owner of a printer that extrudes filament evenly during the entire job. Now that the event is recent and you still remember how much you hated fixing this issue, you may be willing to read about the things you can do to reduce the probability of doing this again in the near future.
Here are some tips to prevent printer from suddenly not extruding during a print:
Reduce printing speed
When working with flexible materials and or that require higher temperatures (such as Nylon), it is important to respect the speed limit imposed on the 3D printer datasheet.
What will determine the speed of printing in FFF/FDM 3D printers are the properties of the material being used as well as the quality of the components of your 3D printer.
For flexible filaments on Bowden machines, it’s not recommended to go faster than 20mm/sec. For machines with a direct drive, the recommended speed is 40mm/sec for medium and high hardness flexible filaments and 25mm/sec for low hardness flexible filaments.
Always use good quality filament
As mentioned lines above, the filament you use can be the greatest enemy when it comes to the overall health of your hotend. Non-regular material can trap the filament within the tract until the end of the hotend’s stroke. Additionally, a dirty filament can cause small dust remains to form a wall of sediment inside the nozzle cavity or in the hotend throat.
To prevent this problem, we can create a small filter for impurities. Just wrap a clean piece of sponge attached to a plastic clamp around the filament so that the dirt ends up gets cleaned there before getting into the hotend path.
Hotend fan
The hotend fan is crucial for the filament to remain at a stable temperature before being heated by the heating block. If it loses efficiency, the filament will heat up ahead of time, expanding inside the hotend’s body and causing an obstruction. Therefore, you must always keep the fan clean and in excelent condition.
PTFE Tube
The Teflon tube has a lifetime that is limited by the temperature and its use. The standard 3D printer tube can´t handle temperatures above 240°C. One of the first signs of a faulty PTFE tube are under-extrusion or filament noises inside the extruder. When this happens, replace the PTFE tube in order to avoid clogging the nozzle.
An even better fix would be to purchase the blue Capricorn tube since it can withstand higher temperatures.
Conclusion
A clogged extruder is often a huge headache for many users and even more so when we need to print something as soon as possible. It’s important to guarantee a smooth and continuous flow of the filament into the extruder. This, in addition to lengthening the life of the extruder, will also lead to overall better print quality.
All of the solutions and fixes detailed neither difficult nor expensive. You just need a little patience and resilience to enjoy these incredible machines!
Check out our recommended products section

We created a recommended products section that will allow you to remove the guesswork and reduce the time spent researching what printer, filament, or upgrades to get, since we know that this can be a very daunting task and which generally leads to a lot of confusion.
We have selected just a handful of 3D printers that we consider to be good for beginners as well as intermediates, and even experts, making the decision easier, and the filaments, as well as the upgrades listed, were all tested by us and carefully selected, so you know that whichever one you choose will work as intended.
Error processing API data.
During mid print my nozzle lowered it’s self into my print. I’m not sure what caused it but it completely ruined the print. What causes this to happen?
Thank you for this article.
I started experiencing print jobs just stopping without any warning. Not a filament issue. At first just occasionally, then finally with every job, over an hour into.
At first I presumed it was an overheating issue so installed heatsinks on steppers and bought a remote temperature device to monitor. I even stuck a heat sink onto the processor and placed a fan over it.
Still no joy.
Interestingly my job often stopped at around the same place so started to think it was a slicer issue so created g-code on alternate slicers. Still no solution.
I’d always wondered if the SD card was losing communication with the printer and this caused the crash. But why at the same place in the print?
I tried a new card and BINGO! Problem solved. There was an issue in the card which re-formatting didn’t even fix.
I hope other people find this post and save themselves a lot of anguish and hours of crashed print jobs.
Thanks again
Another reason is it is plugged into an overloaded power strip, occasionally had to do some detailed airbrush painting and had a small compressor for the brush. Would plug it into the same strip as my monitors and printer, if I forgot to unplug it then overnight while printing it would kick on for a second and completely stop the printer in its tracks(would have to restart the print). Took me about a week, a bunch of new printer parts(which I needed anyway), and nearly losing my mind to realize it was that little compressor killing my prints. Printer is now always on a dedicated circuit.