As our experience in 3D printing grows with the passage of time, we may also get courageous enough to start tinkering with our hardware, install updates or set other start and end G-Code snippets. Seeing how our additions improve the output quality of our machine can be incredibly rewarding and we will surely acquire a huge amount of knowledge while doing them.
When changing a major component of our printer, it may very well be the case that you need to reconfigure its home position due to a difference in dimensions between the old and the new part. This certainly happened to me when I changed my previous hotend for a new all-metal one. The difference in sizes created an offset of about 14mm that needed to be accounted for.
In this article, we will go step by step and explain how to recalibrate the home position of almost every 3D printer.
In order to re-calibrate the homing of a 3D printer, it is necessary to open the firmware, adjust the settings such that they reflect the implemented physical modifications of the machine, recompile the firmware, export it, and upload the generated .hex file to the 3D printer.
Steps for recalibrating a 3D printers home position
Knowing which firmware you 3d printer uses

In order to recalibrate the home position of the 3D printer according to the newly installed hardware (or other possible reasons), it is essential to find out which firmware flavor it uses. Luckily, almost all of the most popular manufacturers use a firmware called Marlin or a custom descendent of it.
Lulzbot printers, Anet, Artillery 3D, AnyCubic, Alphawise, Bibo, BQ, BCN3D, Creality, FLSun, FolgerTech, Geeetech, JGAurora, LMYSTAR, Makerbase, Mingda, Printrbot, Prusa Research, Tevo, TronXY, Ultimaker, Wanhao, and Zonestar are just a few of the popular manufacturers that use Marlin firmware.
For the remaining part of the article, we will assume that you own a machine that uses this firmware, since it will cover almost all cases. Even my printer, whose brand* is not listed because I’m the only person I know that owns one uses this firmware.
*: For the curious ones, the manufacturer is called Createbot. Not the famous Creatbot, but Createbot.
Option 1: Find an out-of-the-box ready version
This option, which is the easiest one, is suited for those users that just want to reset or update the firmware of their printers. Maybe you reversed some upgrades and just want to get back to the default firmware of your machine.
If you this option is suited for your purposes, follow alogn these steps:
1.1 Download your printer’s firmware:
First, let’s make sure you get the latest Marlin firmware version for your printer. Below are some useful links to quickly find it.
- Prusa: https://www.prusa3d.com/drivers/
- Creality: https://www.creality.com/en/download
- Anet: https://shop.anet3d.com/blogs/download
- Ultimaker: https://ultimaker.com/software/firmware
- Generic Marlin: https://marlinfw.org/meta/download/ (needs compilation)
If you own a 3D printer that is not listed above (this list is definitely not an exhaustive one), you will surely find it by searching “YOUR_PRINTER_MODEL + firmware”.
1.2 Connect the 3D printer to your computer
The next step consists of establishing a connection between the machine and your computer. There are various ways by which you can achieve this, but connecting via USB cable is definitely the most straightforward and easy.
Most 3D printers require a USB-B type cable. Although it is a rather unpopular type of universal serial bus plug, your machine most probably included one. Otherwise, that boring plain printer (paper, not 3D), almost definitely uses one which you can borrow for a while.
1.3 Upload the firmware to your 3d printer
This step can be easily achieved with none other than your preferred slicer. In order to keep things short and concise, I’ll guide you through the steps to follow if you are using Cura. Other slicers have an almost identical process.
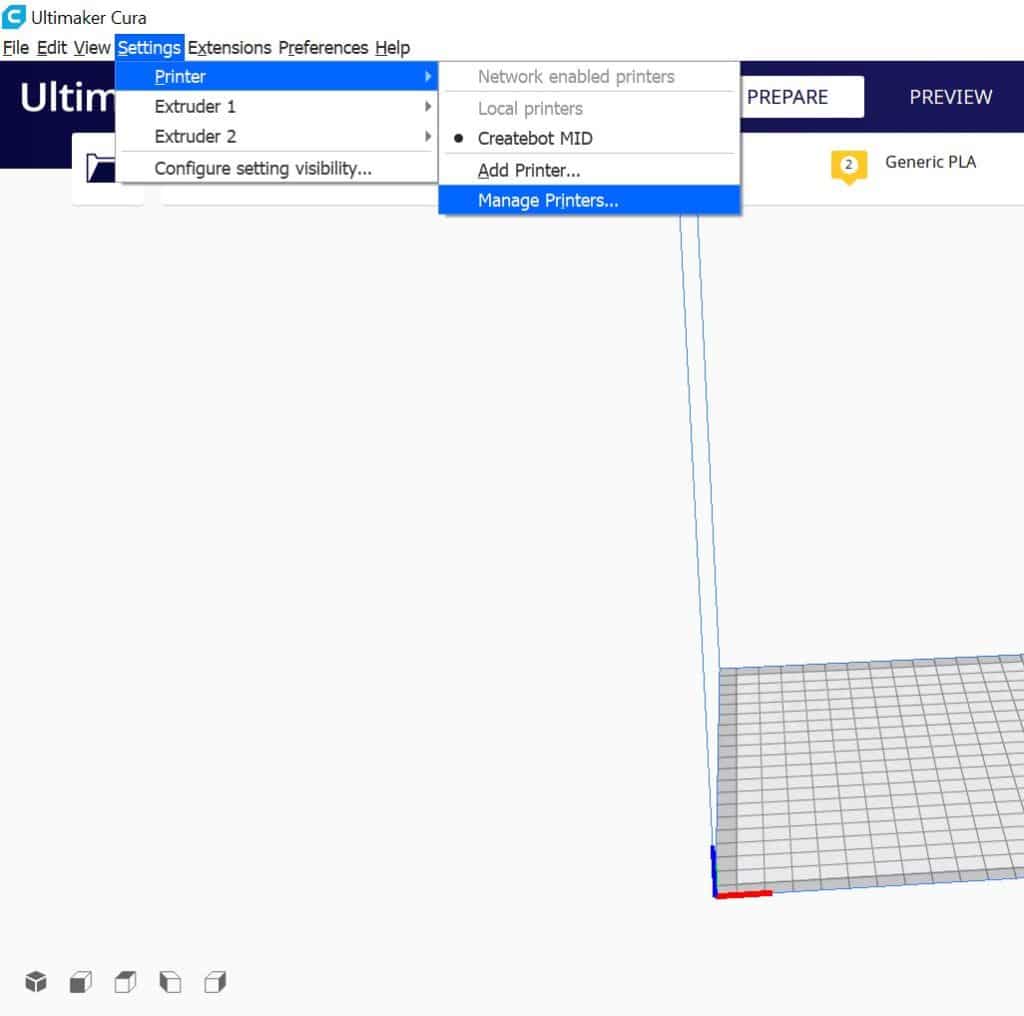
Under “Settings”, choose “Printer” and select “Manage Printers”. After the window is prompted, select your and click on “Update Firmware”.

In order for this step to work, you need to have previously established a connection with your printer (previous step). If you managed to do so, you will be able to click “Upload Custom Firmware”. Now you just need to select the firmware that you download. The target file should have a “.hex” extension.
The uploading can take up to a minute, so make sure that you do not disconnect anything during the process.
If you followed all steps down to a T, you may now pat yourself on the back before using a 3D printer with freshly installed firmware!
Option 2: Compile your own Marlin firmware
This option may seem a bit daunting at first, but keep in mind that if you somehow make a mistake during the process, you can always refer to the first option and revert the changes.
After you successfully complete this process, you will definitely feel like a pro, and will most surely run circles around your community of 3D printers.
Before getting started, make sure you have Arduino IDE installed on your computer since it will be required in order to compile the firmware. You can download it for free from here.
Let’s get started!
2.1 Download the source of the Firmware
The first step consists of downloading the source code of the Marlin firmware. Do not panic before starting, no programming experience is required to follow along this route.
You can download the Marlin source code from here.
On the off chance that you own a CubeAnet8, an Anycubic 4MAX, a TronXY X5s, or an Anet AM8, you can download prepared firmware from this awesome website. Just in case you were thinking that this was not difficult enough, you will notice that I redirected you to a site in German.
2.2 Modifying the configuration of the Marlin Firmware

Using the Arduino IDE, open the file named “Marlin.ino”, which is located inside the “Marlin” folder. Go to the “Configuration.h”* sketch file and look for the following lines:
// Travel limits (mm) after homing, corresponding to endstop positions.
#define X_MIN_POS -10
#define Y_MIN_POS -15
#define Z_MIN_POS 0
*Since your printers was probably shipped with a custom configuration file, it is a best practice to request it from your seller or manufacturer and do the changes on that file.
You will need to adjust these settings until the desired position is achieved. This iteration may become tedious if you decide to do it by trial and error instead of measuring with a caliper, so it may be useful to use Repetier Host in order to make things a little smoother.
2.3 Compile the Marlin Firmware
Once you finished modifying the settings, you can click on “Sketch” and “Verify/Compile” right afterward.
Compiling for and Ender3 or similar
You may encounter a few issues down the line if you own an Ender3 since it uses an ATmega1284P 16Bit microcontroller, which is not supported by default. In that case, download Sanguino from here and drop the extracted files into the “…/Arduino/hardware” path of your Arduino IDE installation.
After doing so, make sure to set the following options:
Tools>Board:> Sanguino
Tools>Processor:>ATmega1284 or ATmega1284P (16 MHz)
In addition to these two steps, download the U8Glib from here, and add it via Sketch>Include Library>Add .ZIP Library…
Export and upload the compiled firmware to your printer
By now, you probably have some form of post-traumatic stress disorder, but rest assured that the worst part is already behind us. We just need to export the compiled code by clicking on “Sketch > Export Compiled Binary”.
Arduino IDE will export two file, namely “Marlin.ino.sanguino.hex” and “Marlin.ino.with_bootloader.sanguino.hex”. The only relevant file for our current purpose is the first (“Marlin.ino.sanguino.hex”).
There is no need to research anything about bootloaders and flashing memories since we can upload it by means of our preferred slicer. The remainder of the process is now the same as in Option 1. All that is left to do is connect the 3D printer to a computer via a USB B cable and upload using a slicer.
Can your 3d printer lose its home position during a print?
It is not uncommon that a 3d printer suddenly has a shift in the X or Y axis at a random layer and all of the remaining ones. Although lots of enthusiasts may think that this may be caused by a firmware problem leading to the printer randomly forgetting its home position, the real cause of the problem is in the hardware.
In such cases, instead of recalibrating the home position, the solution may rely on checking the machine for loose, misaligned, or incorrectly positioned parts. The cause of the problem is probably found on the belts, the motor drive pulley, the rods, or the X-Carriage.
The reason why a sudden shift on the X or Y axis is not caused by a home calibration problem is because of the way the 3D printer actually works.
When a new print starts, you may notice that it does a routine in which it goes to its home position before initiating the entire job. After the said routine, the printer only follows the instructions given by the G-Code and actually does not remember any previous notion of the initial position. It just assumes that it correctly homed and that all the following movements were correctly executed.
For example, if the belts of the 3D printed are not tight enough, it may lead to a layer shift in the direction of said belt. Since the printer has no way of knowing that this incorrect movement occurred, it just follows its recipe dictated by the file.
How to know if the 3D printers home position is correct
In order to know if the actual home position of the 3D printer is correct, you can choose among at least three easy methods:
Verify via the bed leveling routine
Most modern 3D printers include some sort of auto bed leveling routine which goes through all four corners and the center of the buildplate in order to check if the distance between the nozzle and the surface is even. If you start this routine, it will most probably first go to the corner nearest to the end stop of your printer. You can now visually determine if this position is at least in the ballpark of the correct one.
Print a rectangle with the shape of your buildplate
You can create a square and resize it to the dimensions of your buildplate once loaded into the slicer. In order to not wait for the extruder to reach a normal temperature, you can remove the filament and set the initial temperature to a very low value. This will allow your printer to start moving right away.
Create your own custom G-Code: this is the most straightforward option and consists of creating your own file with these simple two-lines that tell your machine to go to the home position.
G28 ;
G1 X0 Y0 Z15 F500 ;
The first line tells your printer to move to the far corners of your machine until it reaches the end stop. The second line will move the toolhead to the zero position of the X and Y axis at the speed specified by F. Notice that I added a 15mm offset on the Z-axis for safety reasons.
Check out our recommended products section

We created a recommended products section that will allow you to remove the guesswork and reduce the time spent researching what printer, filament, or upgrades to get, since we know that this can be a very daunting task and which generally leads to a lot of confusion.
We have selected just a handful of 3D printers that we consider to be good for beginners as well as intermediates, and even experts, making the decision easier, and the filaments, as well as the upgrades listed, were all tested by us and carefully selected, so you know that whichever one you choose will work as intended.
Error processing API data.
