Leveling a 3D printer is probably the hardest thing you have to learn when you first get your hands on one, and it takes more than a couple days to get the process right, at least it did for me.
However, this is when you level it using a piece of paper to feel how much friction there is between the nozzle and the bed to determine if the distance is set right or not, but you could also opt to use a feeler gauge to do this, and, at least in my opinion, it’s the better way of doing things.
In this article, I will go over how these two methods differ from each other, how to actually do it using both methods, their pros and cons, and lastly, which one I think is best.
So, without further ado, let’s get started!
Leveling the Printer using Paper

This is by far the most common method simply because it’s free and because it also works really well. However, it takes time to learn since you need to feel how much friction there is between the nozzle and the bed when moving the paper.
The issue with using a piece of paper is that it’s not as consistent since you have to rely on your touch to gauge the amount of friction, and more often than not, you’ll encounter that the nozzle is either too close or too far from the bed, especially when you are just getting started with 3D printing, which means that you’ll have to deal with some failed prints.
Essentially, since it’s not as consistent, you’ll probably have to go through the leveling process more than once to get it right and fine-tune it while the printer is printing the skirt/brim to get a great first layer.
Why is getting a good first layer so important?

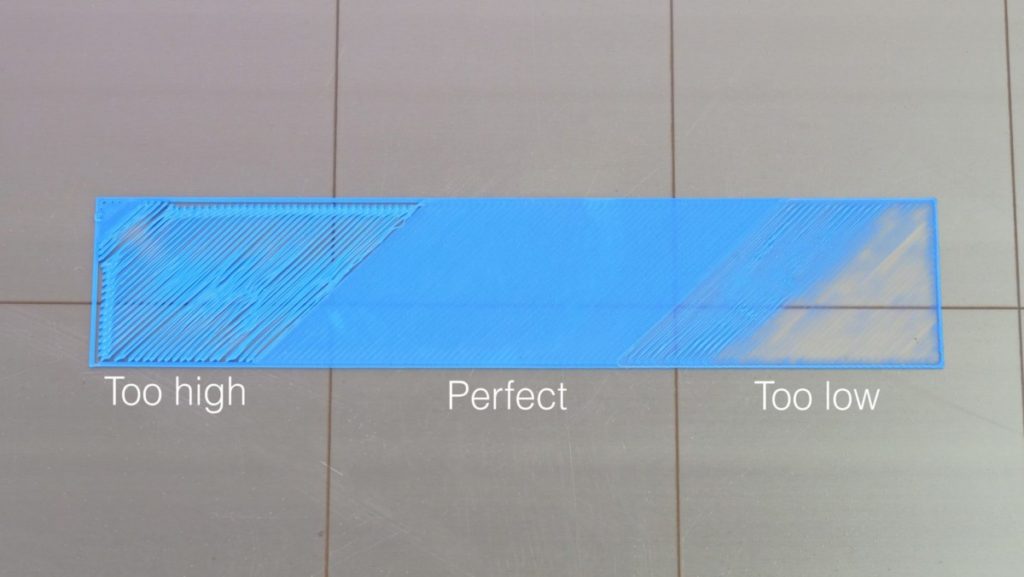
In 3D printing, the first layer is everything; Get it right and your model won’t detach from the build plate, or warp, which means that it will come out beautiful and without having to deal with any hiccups along the way.
On the other hand, not getting the first layer right could result in poor bed adhesion, causing the print to suddenly detach mid print forcing you to start all over.
Pros
- It’s free.
- Once you know how to do it, it’s easy.
Cons
- Not as consistent.
- Takes a lot of time to get right.
Since it’s so important to level the bed correctly, here’s a quick guide on how to do it. However, if you want a complete step-by-step guide on how to level the bed of a 3D printer, make sure to check the article I wrote on that subject.
How to Level the bed using a sheet of paper
- Preheat the printer to the temperature that the filament requires (bed and nozzle)
- Lower the bed by twisting the leveling knobs to the left.
- Home the printer.
- Disable the Stepper Motors.
- Move the nozzle on top of one of the leveling screws (any of the four corners).
- Place a piece of paper between the nozzle and the bed and tighten the screws while moving the paper back and forth until you can feel some friction (if you push the paper and it bends, you need to loosen the screws a bit).

- Do this on all four corners and also in the middle of the bed until you can feel the same friction on all spots.
Leveling the Printer using a Feeler Gauge

Many claim that leveling, or tramming, the bed on your 3D printer bed using a feeler gauge is the optimal way of doing things, and while I may agree in some ways, it’s not a night-and-day difference to the paper method.
It consists in using a feeler gauge that has a specific width (height) to adjust the distance between the nozzle and the bed, and this way you can always set it to 0.2mm, for example, with no room for error.
It’s also a much quicker way of doing it since you don’t need to be testing how much friction there is, if there’s enough or too much of it, etc., and the results will be far more consistent.
The only con to using this method is that you need to purchase a set of feeler gauges which sell for about $10, but that’s about it.
Pros
- More consistent bed level.
- Faster.
Cons
- Not free (about $10).
How to level the bed using a Feeler Gauge

The process of leveling the bed using a feeler gauge is almost identical to the paper method, with one slight difference:
- Preheat the printer to the temperature that the filament requires (bed and nozzle)
- Lower the bed by twisting the leveling knobs to the left.
- Home the printer.
- Disable the Stepper Motors.
- Move the nozzle on top of one of the leveling screws (any of the four corners).
- Place the feeler gauge between the nozzle and the bed, move it back and forth while increasing the height of the bed until you feel that there’s no wiggle room between the feeler gauge and the nozzle (it should fit nice and snug between the nozzle and the bed).
- Do this on all four corners and also in the middle of the bed.
What gauge to use?
If I’m printing my first layer at 0.2mm, then I use the 0.2mm gauge, and the same goes for all the other first layer heights. If I want to print using a 0.32mm layer height and the first layer is also printed at that height, then I use the 0.32mm gauge to level the bed.
Which one is better?
I tested both methods when printing PETG since that’s a type of filament that has a much harder time sticking to the bed than PLA, which meant that I had to nail the leveling process to avoid problems.
Since I have a lot of practice using the paper method, because it’s what I used for close to a year, I had no trouble getting the print to stick, but I realized that the first layer was a bit too close to the bed and was getting squished.
On the other hand, when using the 0.2mm feeler gauge, the first layer came out literally perfect on the first try, and if you want to set your first layer to 0.24mm, 0.16mm, or even 0.8mm, you simply use a different gauge and that’s it, it’s ready to go.
Essentially, using a feeler gauge could be considered to be the superior method since it’s more precise. However, I don’t think that everyone should run out to purchase a set of feeler gauges, even if they are really affordable, since it only takes some practice to get the first layer right using the paper method.
If you’re printing a model that requires absolute precision on the first layer, like this collapsing sword that needs to keep the first layers from fusing together in order to work, then using a feeler gauge to get that first layer perfect is something that I’d recommend.
Otherwise, practice leveling the bed using the paper method. Sure, it will take and you will get frustrated at first, but after twenty or so times that you do it, it becomes second nature.
A better alternative
To be honest, there’s no need anymore to go for a manually leveled printer since there are so many affordable ones out there that come with automatic bed leveling already built-in, and if you already have a printer like the Ender 3, which doesn’t come with a bed leveling sensor already built-in, then you could certainly install one yourself for about $35.
Getting a printer with automatic bed leveling can make your life a whole of a lot easier and you won’t have to deal with prints detaching (in general), and other related issues.
I hope this information was useful!
Have a great day!
Check out our recommended products section

We created a recommended products section that will allow you to remove the guesswork and reduce the time spent researching what printer, filament, or upgrades to get, since we know that this can be a very daunting task and which generally leads to a lot of confusion.
We have selected just a handful of 3D printers that we consider to be good for beginners as well as intermediates, and even experts, making the decision easier, and the filaments, as well as the upgrades listed, were all tested by us and carefully selected, so you know that whichever one you choose will work as intended.
Error processing API data.
