If you’re just getting started with 3D printing, you might not be entirely sure what layer height it is that you should print your models at.
In this article, I’ll go over what layer height is, the relationship between layer height and nozzle diameter and how they differ, since there seems to be a lot of confusion surrounding that specific topic, and I’ll cover what the best layer heights are in general, depending on the application (Print quality, strength, speed, etc.).
So, without any further ado, let’s get straight into it!
What is Layer height in 3D printing?

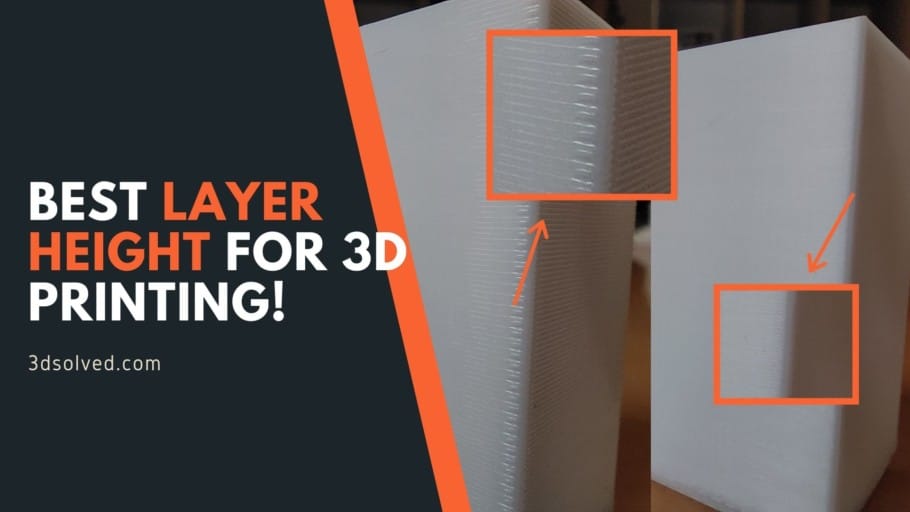
Right: Printed at 0.12mm.
Layer height, also known as resolution or detail, is the height of each individual layer of extruded plastic on a 3D print. The lower the layer height, the more detailed the print will come out because more layers will need to be printed to complete the model. For example; printing a 20x20x20mm cube with a layer height of o.12mm will have 166 layers, but only 71 layers with a 0.28mm layer height.
What’s the tradeoff? Well, printing at a higher resolution, or lower layer height, increases the time it takes to print an object drastically since the printer will need to lay down twice as many layers or even more, whereas increasing the layer height will result in faster prints that have less overall detail.
Essentially, you’re trading print time for detail.
Take these two Benchy prints, for example: The left one was printed at a 0.12mm layer height and the right one at 0.32mm.

Right Benchy Printed at 0.32mm.
The 0.12mm benchy printed in 3:24 hours and has a total of 400 layers, the 0.32mm benchy took 1:26 hours to print and has 150 layers. That’s a pretty big drop in print time and the only difference is the layer height.
As you can see, the right benchy has a lot more visible lines. This is especially noticeable on the roof and the top of the side walls/rails as a very visible staircase effect.
Nozzle Diameters and how they affect layer height

The default nozzle diameter for most printers is 0.4 mm, but they usually range from 0.2mm all the way up to 1mm. Increasing the nozzle diameter will allow you to print at an increased layer height as well as lower the number of perimeters needed to print a wall, for example, since the perimeter itself will be wider. It’s worth noting that the layer height should never exceed 80% of the nozzle’s diameter (there’s no minimum value).
Here’s a table with the recommended maximum and minimum layer heights for each nozzle diameter. It’s worth noting that the minimum values don’t depend on the nozzle but rather on the stepper motors of your printer, which is why generally you shouldn’t go below 0.04mm (more on this in a second), but the reason there’s a minimum value is because printing with a high vertical resolution (low layer height) but with a large minimum line width (nozzle diameter) generally makes little sense.
| Nozzle Size | Minimum Layer Height | Maximum Layer Height |
| 0.15mm | 0.04 | 0.12 |
| 0.20mm | 0.05 | 0.16 |
| 0.25mm | 0.06 | 0.20 |
| 0.30mm | 0.08 | 0.24 |
| 0.35mm | 0.09 | 0.28 |
| 0.40mm | 0.10 | 0.32 |
| 0.50mm | 0.13 | 0.40 |
| 0.60mm | 0.15 | 0.48 |
| 0.80mm | 0.20 | 0.64 |
| 1.00mm | 0.25 | 0.80 |
By printing with a nozzle that has a larger diameter and increasing the layer height you are able to shave off a lot of printing time for the model, sometimes being able to print even three or four times faster.
Now, nozzle diameter and layer thickness are not the same and don’t affect the end result in the same way: Layer height affects print quality mostly on vertical or slanted parts of the print, while nozzle diameter affects the level of detail mostly on the horizontal plane, and this is because a larger diameter nozzle will print wider layers, which shouldn’t be visible vertically.
Essentially, a larger diameter nozzle lays down wider perimeters and also allows you to increase the layer height (up to 80% of the nozzle’s diameter), which results in much faster prints. The catch here is that the printing quality will be much lower than if you printed with a 0.4mm nozzle at a 0.12mm layer height, or even with smaller diameter nozzles and using an even lower layer height, but it will print much faster.
It’s worth noting that using a larger nozzle won’t affect print time when printing in “vase” mode, since it will still have to go through the exact same sequence of moves.
What’s the best Layer height for 3D printing?

For most 3D prints the ideal layer height is 0.2mm because it’s a good middle point between quality and printing speed, both for large prints as well as small and detailed ones, and the layer lines will not be too visible. Lowering the layer height will result in more detail (good for small prints) but will increase the time it takes to print an object, and vice versa.
Of course, this will depend on the needs of your print, since it’s very different to print a miniature, which requires intricate details to be printed with as high of a resolution as possible, and printing a larger, rather functional object that doesn’t need to look all that great but still work.
Best layer height for detail

The lower the layer height, the more detailed the 3D print will come out. However, this is only the case until you reach a layer height of 0.1mm, since going below this, 0.05mm for example, won’t yield any visible increase in quality. For most everyday prints that need a really high resolution, going with 0.12mm seems to be the sweet spot.
It’s worth keeping in mind that printing at 0.12mm instead of the standard 0.2mm will increase the print time by quite a lot as well, which is why you’ll need to ask yourself if that increase in detail is really worth the extra time.
I generally print at 0.12mm when I want to achieve a nice smooth- and detailed finish, and at that point the layers are barely visible.
Best layer height for strength
Generally, a layer height of 0.1mm up to 0.15mm yields the strongest results and going below or above these values will drastically reduce a print’s strength. It’s worth noting that nozzle diameter also plays an important role, since one with a large diameter printed at a low layer height will provide the widest contact surface area, resulting in an overall stronger layer adhesion.
A study was conducted to determine how different layer heights and nozzle diameters would affect print strength. They tested 0.4mm, 0.6mm, and 0.8mm nozzles and varying layer heights and got to the conclusion that the more you increase the layer height the weaker the part becomes, in fact, from minimum to maximum layer height there was a strength difference of about 3.5 times.
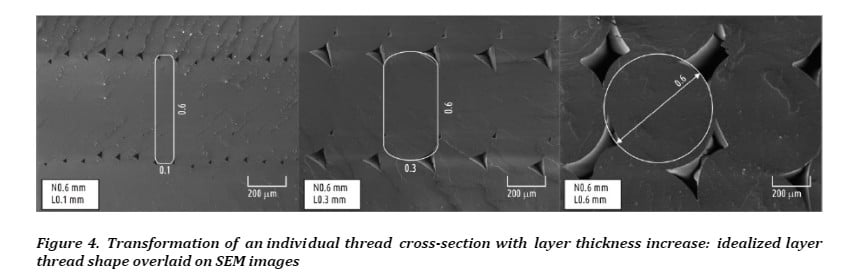
As you can see in this image, nozzle diameter plays a major role since printing with a larger-diameter nozzle but at a low layer height will provide a wider contact surface area for each layer to adhere to the previous one, resulting in an overall stronger bond and therefore, a stronger 3D print.
Consider Layer orientation
An object that needs to withstand a force, like a hook for instance, where there’s consistent traction in the same direction, should be printed in such a way that the layer lines are in-line with the force that’s going to be applied on it.
If you print it vertically, then the layer lines will be horizontal, which means that the hook will only be able to withstand as much force as the layer adhesion allows.
On the other hand, printing it on its side means that the layer lines are in-line with the force that the hook will be subjected to and this increases its strength two times, or even more.
Here’s a video by CNC Kitchen that goes into extreme detail and I highly recommend you watch it if you want to see the difference in strength between different layer heights and layer orientation.
Additionally, the infill pattern also has some major implications on a part’s strength, and depending on what it’s going to be used for, you should use a different pattern.
Best layer height for speed
Print speed and layer height are inversely proportional; The thicker the layer height the faster the print time, and the thinner the layer height the slower the print speed. For example, using the standard 0.4mm nozzle, printing at both 0.32mm and 0.1mm layer heights is possible and printing a 20x20x20mm cube will take 18min and 59min respectively.
If you want to print as fast as possible, then you should use the largest nozzle with the thickest layer height possible. This will cut down the time it takes to print a part dramatically at the cost of lower detail.
For most people using the standard 0.4mm nozzle, printing at 0.28mm or 0.32mm should be the maximum layer height to print an object with. From there on out, the only way of increasing the speed, aside from adjusting some settings in the slicer, is swapping your current nozzle with a larger-diameter one.
Best Layer height for prototyping

Prototyping needs to be fast considering that the printed parts won’t be the final product. Layer height is not the only important factor; so is the nozzle diameter, infill percentage and the print speed settings in the slicer.
In general, you’ll want to use as large of a nozzle as you can, use as little infill as possible (use cubic infill if possible since it’s a 3D infill that’s strong in every direction), the thickest layer height and the fastest printing settings.
It’s worth noting that when you increase the print speed, you may run into a couple issues; The previous layers might not have solidified properly, you may get a lot of ringing and ghosting, bad dimensional accuracy, and more.
The speed settings will vary for you depending on what printer you have, but setting the perimeter speed to 100mm/s and infill to about 200-250mm/s should be a good start and reduce the print time drastically.
How much does Layer Height matter?
Increasing the layer height results in a faster print because the printer doesn’t need to lay down as many layers to achieve the same height, but the resolution and quality will be decreased due to the thicker layers. To achieve a smooth-looking and detailed print, a lower layer height is recommended.
If you go back to the two benchy prints I linked earlier, you can clearly see the infill lines on the one printed at 0.32mm, while on the 0.12mm benchy those lines are barely visible. Where it’s most apparent, however, is on the roof and the Rails/side walls of the benchy, since there’s a clear staircase effect.
The more you lower the layer height, the less obvious those layer lines will be and any staircasing effect will be much less apparent, however, increasing the resolution will result in longer print times, and there comes a point when lowering the layer height even further won’t yield any significant improvements in quality, but the print time will be increased by a lot.
In general, 0.12mm or 0.1mm are enough to produce extremely detailed results. Any lower than this and you’re just trading time for marginal quality improvements, if any.
3D Printing Layer Height Calculator

Prusa developed an Optimal Layer height calculator that lets you select a layer height where your Z axis moves only in full step increments. Z axis isn’t usually enabled during inactivity. If the axis is disabled during micro-step, the axis jumps to the closest full step and introduces an error.
This is most useful to machines with imperial leadscrews but also for unusual layer heights with metric leadscrews.
Just introduce some parameters and it will give you the ideal layer height.
Ender 3 stepper motor magic numbers
Layer height can be broken down into “magic numbers”. These magic numbers are essentially the layer heights that work best on a particular printer.
For the Ender 3 models, the magic numbers are in increments of 0.04 mm because the threaded rod lifts 8mm per one revolution, and it does this in 200 steps (per revolution).
Divide those 8mm by 200 and we get to the magic number of 0.04mm per step.
You want to stay on that magic number because then the printer is at the same position relative to each step when moving up, and this will increase the quality of your prints because the printer will be consistent in how it’s moving up.
Once you know the magic number you can do variations of it, such as:
- 0.24 mm
- 0.20 mm
- 0.16 mm
- 0.12 mm
- 0.08 mm
Previously, you had to set these up manually on your Slicer since the standard settings would set the layer heights to 0.1mm, 0.15mm, etc. and none of those are multiples or 0.04mm.
Now most slicers, such as Cura in its newer version, have different layer heights that are consistent with this “magic number”, such as 0.12mm for fine detail or 0.28mm for coarse detail, and all of these work perfectly well with any Ender 3 machine (as well as any printer that moves at 0.04mm per step).
Issues associated with different Layer Heights
Like I previously mentioned, printing with a large nozzle and thick layers will result in an increase in printing speed, but the model will look pretty bad and might not be as strong since the layers of plastic don’t have as much contact surface to adhere to each other.
On the other hand, going with extremely thin layers, such as 0.05mm, may result in a loss of quality and various imperfections on your print, as well as an incredibly long print time for even the tiniest of objects.
If you decide to print at a really high resolution (low layer height), unless you get the bed leveled to perfection, you might find that your prints won’t really stick to it.
In this case, I’d recommend printing a larger first layer to get the print to stick to the bed strongly, and then set the following layers to print at the desired layer height.
Conclusion
There is no “one size fits all” layer height since you want to adjust it depending on what you are printing.
If you’re designing something yourself, prototyping, etc., and you need to print various iterations before the final product is ready, print at 0.28mm (if you have a 0.4mm nozzle). This will ensure that the print comes out fast and is still functional while still looking pretty good.
Once you’re ready to print the final design, you may lower the layer height.
In general, I’d recommend sticking to 0.2mm since this seems to be where the sweet spot is for most 3D prints, both in terms of quality and speed.
I hope this information was useful!
Have a great day!
Frequently Asked Questions
Check out our recommended products section

We created a recommended products section that will allow you to remove the guesswork and reduce the time spent researching what printer, filament, or upgrades to get, since we know that this can be a very daunting task and which generally leads to a lot of confusion.
We have selected just a handful of 3D printers that we consider to be good for beginners as well as intermediates, and even experts, making the decision easier, and the filaments, as well as the upgrades listed, were all tested by us and carefully selected, so you know that whichever one you choose will work as intended.
Error processing API data.
I enjoyed your article and found the nozzle minimum and maximum layer height to be particularly useful. You’re right, when you just start out 3D printing it is very difficult to understand all of the challenged one will run into. I found this website had a beginners tool box that would have been helpful when just starting out.