If you ever had this issue happen to you where the print head is moving and then suddenly rips the whole print off the bed, or if you’ve dealt with a clogged nozzle at some point and didn’t know how to properly unclog it, then stick around since I will cover how to solve both of these issues in this article.
So, without any further ado, let’s get started with the simplest problem to fix!
If you don’t want to have to go through all the trial and error that we did in order to find the Ideal Settings for creating high-quality prints on your Ender 3, then definitely check out our own Cura Profiles tailored specifically for the Ender 3 Printer Series.
Clean the nozzle and heatblock using a brass brush

Molten filament can adhere to the nozzle and even to the heatblock and this might cause the nozzle to stick to the print, ripping it off the build surface while moving.
This issue isn’t that common when printing with PLA or ABS, but PETG, for example, has a different viscosity when melted and it tends to stick to the nozzle & heatblock a lot easier, causing a filament blob over time that can detach the print from the build surface.
Here’s how to clean the nozzle and the heatblock:
- Remove the fan shroud by removing the two screws.

- Remove the silicon boot on the heatblock (if there is any).

- Heat up the nozzle to the plastic’s required temperature (200°C for PLA).
- Using a brass brush remove all of the filament on the heatblock and nozzle.

- Let everything cool down and reinstall the fan shroud.
To prevent this issue from happening too often, I’d recommend installing a silicon boot on your printer. Most printers already come with one pre-installed, but if it didn’t, then simply get one and install it yourself after thoroughly cleaning the hotend first.
The silicon boot will prevent the filament from sticking to the nozzle & heatblock and you won’t need to clean it as often.
Clogged nozzle: How does it happen?
Clogs are a very real issue that can happen to any 3D printer and that can cause havoc to your printer, ruining a print and even forcing you to sometimes having to disassemble the entire hotend to clean it.
The main reasons for a nozzle getting clogged are;
- Heat Creep: When the heat travels farther up the hotend than it should and melts the filament where it shouldn’t be melted, slowly adhering to the walls and tightening the gap where the filament is.
- Nozzle to close to the bed: This doesn’t allow for proper filament flow and may cause “retrograde extrusion” (when the filament goes back up the nozzle), causing clogs.
- Too low of a printing temperature: If the temperature of your hot end is too low, your print material will not melt correctly. This can cause the material to begin to adhere to the inside surface of the nozzle which will also increase the pressure inside the print head, causing the extruder to have to push harder to move the filament (until it can no longer feed the filament into the head).
- Dust Buildup: Dust that makes it inside the hotend may burn and adhere to the sides of the nozzle in the form of carbon, which will narrow the width of the nozzle’s opening over time causing it to clog or to under-extrude.
- Poor Quality filament: Not all filaments are made following the same strict quality guidelines, and some may have a higher tolerance (diameter throughout the entire spool) than others, or they might come with some contaminants that burn in the nozzle and cause it to clog over time.
Let’s take a quick look at how to deal with clogs as well as the necessary measures you need to take to prevent them from happening in the first place.
How to unclog a 3D Printer nozzle (shown on Ender 3)
Even though I’m going to be showing how to do this on an Ender 3, you can certainly follow the exact same steps for any other printer out there since it’s pretty much the identical process.
Unclog the nozzle using the included 0.4mm needle
All printers come with a needle that is used to unclog the nozzle, but if yours doesn’t then you can get one here.
Here’s how to unclog the nozzle using a needle:

- Preheat the printer to the filament’s melting temperature (200°C for PLA, 230°C for PETG and ABS, etc.).
- Insert the needle through the hole in the nozzle and push the filament upwards, then pull the needle out (repeat multiple times).
- Extrude some filament to check if it’s flowing correctly.
- Repeat the process if necessary.
Generally, this should solve the issue since pushing the clog upwards will force it to be melted. Also, if there’s any dirt or dust that is causing the clog, pushing it may break it into smaller pieces that can then be extruded with the filament through the nozzle’s opening.
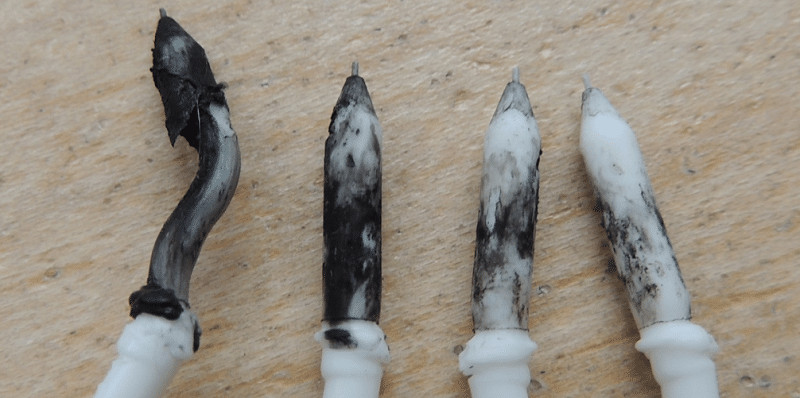
Perform a cold Pull (Atomic Pull)
Doing a cold pull is just what it sounds like: You remove the filament from the printer without properly heating the nozzle, causing the cold filament to take whatever material there is that is blocking the nozzle with it.
Here’s how to perform a cold pull:
- Heat the nozzle to 220°C (If you just printed with PLA).
- Insert a piece of white or light-colored Abs, Nylon, or any strong filament with good thermal resistance.
- Push it manually as hard as possible.
- Observe if the filament flowing through the nozzle (if the obstruction is total, it may not extrude anything).
- Let the printer cool down to around 90°C for PLA and 160°C for ABS. Keep the pressure during cooling.
- When the printer reaches the lowest temperature mentioned in step 5, remove the filament quickly and forcefully from the hotend and inspect the semi-fused part of the filament. This must have a little bit of dirt (black spots). Those black spots were causing the blockage.
- Cut the dirty part of the filament and repeat from step 2 until the filament comes out clean.
Using this method is a great way of removing most of the dirt and dust that may have gotten inside of the nozzle, which you might have not been able to remove using the needle method.
Just be sure to not damage the printer when pulling from the filament, since you may need to put in a little extra force to get it out.
Use a Cleaning Filament
There are a couple filament brands out there that sell a “Nozzle Cleaning Filament” that works surprisingly well.
To use it simply load it into your printer like you would with any regular filament (with Direct drive printers). If your printer uses a Bowden setup, then it’s advisable to remove the Bowden tube first and to manually feed the filament into the hotend.
How to clean the nozzle using cleaning filament:
- Preheat the nozzle to the temperature required for the cleaning filament (usually 230°C).
- Push the cleaning filament all the way in until a little comes out through the nozzle and then just let it sit there “cooking” for a couple minutes.
- Once five minutes have passed, feed a little more filament into the nozzle and wait again.
- Repeat this process a couple of times.
- Remove the cleaning filament and load regular filament into the printer.
- Extrude some filament to check if it’s coming out properly.
This method works surprisingly well and I recommend it to anyone who just wants to let the printer clean the nozzle by itself and who doesn’t want to have to go through the process of doing a couple cold pulls or inserting a needle into the nozzle.
Unclog/clean the nozzle outside of the printer
All of the methods I just described are done with the nozzle still installed on the printer, but sometimes it’s not enough and you have to remove the nozzle to really “get in there” and clean it thoroughly.
If you never removed the nozzle on your 3D printer, it’s not that hard to do. However, always, and I mean ALWAYS, preheat the nozzle before unscrewing it as well as when you’re screwing it back in (you can screw it in cold but don’t tighten it. Do the final tightening after heating it up), otherwise you may damage the hotend.
Now, I would recommend doing a couple cold pulls before unscrewing the nozzle to remove as much material as possible first. Once you remove the nozzle you have two options; remove the gunk mechanically or using solvents.
Clean the nozzle using solvents (ABS, PLA)
Depending on the filament that caused the clog, you can use different kinds of solvents to remove said clog from the nozzle. However, you will first need to completely remove the nozzle from the printer. Just remember to preheat the printer before removing it.
How to unclog a nozzle using solvents:
- Remove the nozzle from the printer and place it into a vat or bowl of the following solvents for a couple of hours: Ethyl Acetate for PLA and Acetone for ABS.
- If you were using another filament, check what solvent works for it and place the nozzle inside of it for a couple hours.
- Take the nozzle out of the solvent and use pliers, needles, and other pointy objects to remove the rest of the filament and dirt particles.
Clean the nozzle mechanically

While this may probably be the best method of all, you will need a heat gun or some other way of seriously heating up the nozzle to a point where the plastic inside of it softens a little, some long nose pliers and the same needles I mentioned earlier (the ones that generally come included with the printer), so keep that in mind.
How to clean the nozzle using the heat gun:
- Set the heat gun to low and place it on your working surface (desk) facing upwards.
- Using pliers, place the nozzle directly into the heat until it’s heated up.
- Use the needle and the long nose pliers to remove as much of the contaminants as possible.
Go through this process until you can see that the nozzle is now clean (look straight through it and if you can see that the opening is perfectly round, you should be good to go).
Note: Be careful with hardened nozzles, however, since overheating them may cause them to lose their hardened properties and may get damaged.
How to prevent the nozzle from clogging up
While it may not be that difficult to clean a nozzle, preventing it from happening is much smarter than just dealing with it once it happens.
Here are some recommendations on how to avoid nozzle clogs which are really easy to implement:
Keep the printer in a clean environment
Since dirt & dust buildup can cause the nozzle to clog, keeping the printer in a room that is clean and where there isn’t as much dust flying around will help prevent those dust buildups over time.
This is because dust will adhere to the filament, which will then be pushed into the nozzle by the extruder and all those dust particles will “cook” and burn inside of the nozzle causing it to clog over time.
Of course, there is a solution to this problem and it’s almost free.
Use a filament dust filter

Filament dust filters are just that; a filter that goes around the filament and removes all the dust before it enters the hotend or the Bowden tube.
The are plenty of designs online that you can download for free and print, but you don’t even need to do that since you can simply cut off a little piece of a regular kitchen sponge and stick the filament through it.
Now every time the extruder pulls on the filament, it has to go through that piece of sponge and all the dirt and dust will be wiped off.
Use quality filament
Like I mentioned earlier, not all filament is made equal and not al manufacturers have the same strict quality-control and some filaments may come out with a larger tolerance (with a diameter that varies more than it should), or with strange particles in it that may cause clogs over time.
Essentially, don’t buy the cheapest filament you can find simply because it’s affordable. Read reviews and opinions about it before you decide to buy.
The brands that I generally use are SUNLU or Hatchbox, which are all quite affordable and I never had a problem with any of them.
Don’t preheat indefinitely
Preheating the nozzle for long periods of time means that the filament gets to sit inside of the nozzle and “cook” for much longer than it’s supposed to, and even though it might start to ooze, over time it’s going to start melting farther up, similar to what happens with “heat creep”, and cause a blockage.
Generally speaking, you should preheat the printer and start a print as soon as it reaches the desired temperature. Leaving it preheating for 30 minutes could cause some problems.
If you don’t want to have to go through all the trial and error that we did in order to find the Ideal Settings for creating high-quality prints on your Ender 3, then definitely check out our own Cura Profiles tailored specifically for the Ender 3 Printer Series.
Conclusion
If you notice that filament is starting to get stuck to the nozzle and the heatblock, use a brass brush (or steel, if the nozzle is made out of steel) to remove it. Just remember to preheat the nozzle first.
This will keep said plastic from sticking to the print and ripping it off the build plate.
Also, if your heatblock & nozzle don’t have a silicon boot, make sure to get one and install it since it will help a lot!
If you’re dealing with a clogged nozzle, then I’d recommend going through the steps in the order I listed them, since you may want to try cleaning the nozzle while it’s still attached to the printer first for practicality reasons.
If that doesn’t work, then unscrew the nozzle AFTER PREHEATING IT and go through the rest of the steps.
I hope this information was useful!
Have a nice day!
Check out our recommended products section

We created a recommended products section that will allow you to remove the guesswork and reduce the time spent researching what printer, filament, or upgrades to get, since we know that this can be a very daunting task and which generally leads to a lot of confusion.
We have selected just a handful of 3D printers that we consider to be good for beginners as well as intermediates, and even experts, making the decision easier, and the filaments, as well as the upgrades listed, were all tested by us and carefully selected, so you know that whichever one you choose will work as intended.
Error processing API data.