I love my Ender 3, but there’s one thing that I can’t really stand and that’s all the noise it makes while printing since I have it sitting in my room about 1.5mts away from where I work, and it ends up annoying me after a couple hours.
I decided to mod it and to install a couple of Noctua’s silent coolers, and I also printed a cover for the PSU fan which helped lower the noise even further.
In this article, I will be going over how to install all the fans, what tools you need to do so, what printable replacement part you will need to print beforehand, and more, but just know that there are plenty more upgrades out there that will help your Ender 3 run a lot more silent, especially the mainboard with the silent drivers.
If you don’t want to have to go through all the trial and error that we did in order to find the Ideal Settings for creating high-quality prints on your Ender 3, then definitely check out our own Cura Profiles tailored specifically for the Ender 3 Printer Series (You can get all of them for just $7).
So, without any further ado, let’s get started!
What you will need
Luckily, most of the tools you need to do this already come with the Ender 3, and as far as the cables go, you can definitely use the ones that were connected to the original fans.
Here’s what you’re going to need:
- 2 x Noctua 40x20mm fan
- 1 x Noctua 40x10mm fan
- Buck Converters (at least 3, and 4 if PSU fan is 24V. I recommend getting the ones with the built-in display to see the voltage)
- Multimeter (if you want to get the cheaper buck converters without the display)
- 10 x 20mm m3 bolts (better to get an entire set of differently sized m3 bolts)
- Heat-shrink cable sleeves
- Heat Gun (optional since you can use a lighter)
- Allen Keys (The ones that come with the Ender 3)
- Side Cutters/Pliers (included with the Printer as well)
Note: The number of fans I’m recommending here worked for my setup since I printed a new fang/fan duct, but you could certainly use another one and choose the number of fans that you need for your specific setup.
Important note: The Noctua fans are really silent but they don’t push as much air as the stock Ender 3 fans, which is why I don’t recommend installing 40x10mm fans on the hot end and for part cooling since the airflow won’t be enough. Those need to be more powerful, which is why I’m using 40x20mm.
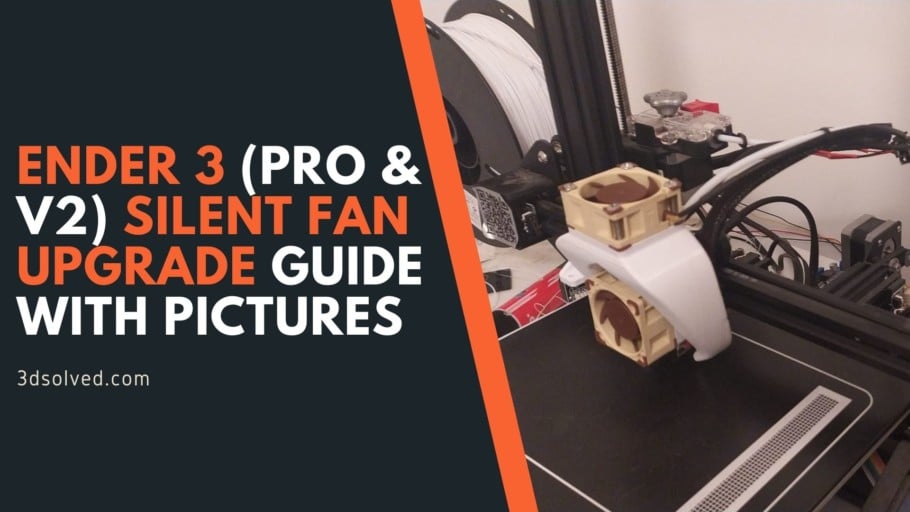
Fan Duct/fang you need to print
I went for this fan duct/fang that you can get for free from Thingiverse, but you could definitely use a different one if you so desire.
This one does amplify the sound of the part cooling fan slightly, making the Noctua fan not as silent as it could be. Still, it’s nowhere near as loud as the stock fan.
Simpler solution (not as silent)

If you don’t want to replace the part cooling fan but you want to swap out the stock hot end fan for a larger Noctua one, then you’ll need to print this new fan shroud that is large enough to fit a 40x20mm fan.
Even though this might help reduce noise slightly, the part cooling fan will still be the stock one, and it’s quite loud! However, it’s not a fan that runs 100% of the time and if you need to swap it out or not depends entirely on the material you’re printing with since you could get away with having it off or spinning at a lower RPM.
Now, let’s move on and see how to actually install the fans:
Hot End fan Replacement

The Hot End fan is the one that runs 100% of the time in order to keep the hot end from getting too hot, causing heat creep, clogs, under extrusion, etc., which means that it’s probably the first fan you’ll want to replace.
You’ll be using one of the Noctua 40x20mm fans I linked earlier here since it needs to be able to push enough air.
Here’s how to do it:
- Unplug the printer.
- Remove the fan shroud by unscrewing the two bolts using the appropriate Allen key.

- Remove the 4 screws that hold the fan against the shroud.
- Optional: Unscrew the part cooling fan as well (makes the process easier since the shroud can be completely removed).
- Cut the hot end fan cables.

- Place the printer on its side (power supply up) for easier access to the mainboard.
- On the underside of the printer, cut the sleeve that surrounds the cables just slightly and pull the thin red & black cables out through that slit (these should slide out easily since they are no longer attached to the fan).
- Cut the cables again and connect the end of the cables that comes from the power supply to the Inputs of the buck converter (red to positive and black to negative).

- Connect the other end of the cables (the end that you pulled out through the sleeve and that are not connected to anything on either end) to the outputs of the buck converter (again, red positive and black negative).
Note: The buck converter will take the incoming 24V and convert them to a lower value determined by you. If you connect a fan now to the cables coming out of the buck converter and turn the printer on, the fan will be receiving 24V, and the Noctua fans need 12V.
They will run, yes, but a lot faster and this makes them noises. Not to mention that they will get damaged fairly quickly.
Here’s how to adjust the buck converters:
How to adjust the buck converters

Once you connected the cables coming from the mainboard to the input of the buck converter (red = positive and black = negative), you can turn on the printer.
If you bought the buck converters I recommended, you should be able to see both the input and output voltages on the display. To swap between the two simply tap the little black button.
It should be showing something like 24.4V on the input and 23.5V or so on the output. This is way too high for what we need, so it’s time to step-down the voltage.
To adjust the voltage, take a small flat-head screwdriver and turn the small “trimmer” or small screw counter clockwise (you may need to give it about 5-6 turns before it starts stepping down the voltage).
Fine-tune it until it’s at 12V and you’re done!
Now back to the fan installation process:
- Turn the printer off again.
- Use the small adapter that comes with the Noctua fans (the one with the two wires hanging out) and remove a little of the insulation on the tips using the side cutters.


- Connect it to the cables coming out of the buck converter making sure to put them through a small heat shrink sleeve so that you can push the sleeve over the wiring (again, red to red and black to black).
- Heat up the heat shrink sleeves until they shrink.
- Connect the 40x20mm fan to the adapter and turn the printer on (it should start spinning).
- All that’s left to do now is to install the fan onto the new fan duct/fan shroud, depending on which way you decided to go, and either do the same for the part cooling fan, or fasten the cable to the sleeve using zip ties if you’re not planning on replacing the part cooling fan as well.
In my case, since I also replaced the part cooling fan, I didn’t fasten the cables to the sleeve since I needed to do that for the cables of both fans.
Talking of the part cooling fan, here’s how to replace it as well:
Part cooling fan replacement

In order to replace the part cooling fan, you’ll have to print a new kind of fang/fan duct to be able to push the air towards the nozzle. I printed the one linked at the beginning, but a quick search for Noctua Ender 3 fang on Thingiverse or on our own STL search engine should yield a couple results.
It’s worth noting that the stock Ender 3 part cooling fan is more than capable of proper part cooling and that it doesn’t need to be replaced, at least not as far as printing quality is concerned. The only issue with it is that it’s really loud, which is why I decided to replace it.
Here’s how to replace it:
- Cut the Yellow and Blue wires attached to the fan (close to the fan, if possible).
- Use the same slit you cut open on the sleeve on the underside of the printer to pull the cables out through it.
- Cut the cables just as you did with the Hot End fan cables.
- Connect the yellow and blue cables to the input of a buck converter (Yellow = Positive and Blue = Negative).
- Connect the other ends of the Yellow and Blue cables to the output of the buck converter (yellow to positive and blue to negative).
- Turn the printer on and adjust the buck converter until it’s at 12V.
- Put a small heat-shrink cable sleeve on the cables (one for the positive side and one for the negative) and then connect the cables coming from the output of the buck converter to the small Noctua adapter, the one with the small red and blue wires. Connect the red and yellow one together (positive) and blue and black together (negative).
- Heat up the shrink sleeves until they firmly grab onto the cables.
- Connect the fan to the adapter and see if it works by turning on the printer.
- Turn the printer off again and install the fan on top of the fang/fan duct.
- Use Zip ties to fasten the cables to the sleeve and Bowden tube while making sure that they have a bit of slack to them since the print head needs to be able to move freely.
That is technically it, although you now have the buck converters lying around underneath the printer, which is not a good look.
You could use double-sided tape to tape them against the extrusions under the printer, or you could print this all-in-one rear mounted electronics case and place the buck converters inside of it (It’s actually designed to have the mainboard installed on the back of the machine, but you could print it only to hide the buck converters). You may need to make some small adaptations/holes for the cables, but that’s it!
Mainboard fan replacement

Replacing the mainboard fan is an extremely straightforward process since you’re swapping out the stock 40x10mm fan for another 40x10mm fan, which means that it will fir perfectly onto the sockets where the previous fan was installed.
Again, here you’ll have to resort to a buck converter to lower the voltage to 12V.
Here’s how to do it:
- Unscrew the three bolts on the underside of where the mainboard is, as well as the one on top and remove the cover.
- Disconnect the fan from the socket.
- Cut the cables as close to the fan as possible.
- Connect the cable to the buck converter’s inputs (red=positive and black=negative).
- Connect the Noctua adapter (the one with red and black cables hanging out) to the buck converter’s outputs (red=positive and black=negative).
- Turn the printer on and in the temperature, settings turn on the part cooling fan (the mainboard fan only runs when the part cooling fan does).
- Down-step the voltage to 12V by turning the small screw counter clockwise on the buck converter.
- Turn the printer off and connect the fan. (Turn back on again to test if it’s working. Again, part cooling fan needs to be running).
- Screw it in place using the screws of the stock fan.
- Use double-sided tape to keep the buck converter from moving around and shorting on the casing.
- Screw the mainboard’s cover back on and you’re done.
Since the mainboard fan only starts running when the part cooling fan is engaged
PSU fan replacement
The PSU fan, depending on the power supply your specific Ender 3 came equipped with, may have a 24V or a 12V fan running inside of it.
My Ender 3 came with the Mean Well PSU and the fan is 12V.

Now, the power supply fan doesn’t run 100% of the time like the hot end fan does, but when it kicks in it’s really loud, which is why I’d recommend replacing it with a Noctua fan.
You’ll need to get a 60x25mm Noctua fan and print a new PSU cover to be able to fit it, since sadly there are no really quiet 60x10mm or 60x15mm fans out there that fit inside of the PSU.
Here’s how to do it:
- Disconnect the printer as well as the power supply cable (the one that comes out the back).
- Unscrew the two bolts that hold the PSU against the extrusion of the Ender 3.
- Open the PSU by removing the 2 screws on each side.
- Remove the screws that hold the fan in place and disconnect it.
- If your PSU uses a 12V fan, then cut the cable on both the PSU and Noctua fans and connect the end that was connected to the PSU to the Noctua’s cables (red to red and black to black. Ignore the yellow cable, leave it disconnected). If it’s a 24V fan you’ll need to utilize a buck converter to lower the voltage to 12V (check the guides above to find out how to do it).
- Use the screws to install the fan, close the PSU and install it again on the extrusion of the Ender 3.
- Connect the two cables to the PSU (power and the one that goes to the mainboard) and you’re done.
Before and after noise comparison
I measured the noise level using a free Android App, and while I don’t think that it’s really that accurate, I only used it to measure the difference between the stock cooling setup and the Noctua fan setup, and the results were pretty impressive.
The Ender 3 Pro that I have in its stock form (it came with the silent mainboard), was generating an average of 56dB, whereas after installing the Noctua fans it went down to an average of 37dB. Now, that may not sound as a lot to many people, but a 10dB increase is needed for a sound to be perceived as twice as loud, and in this case it was close to 20dB, which is a huge difference.
Here’s the video comparison:
If you don’t want to have to go through all the trial and error that we did in order to find the Ideal Settings for creating high-quality prints on your Ender 3, then definitely check out our own Cura Profiles tailored specifically for the Ender 3 Printer Series (You can get all of them for just $7).
Conclusion
If you have your printer running in the same room that you work- or spend a lot of time in, then I’d highly recommend upgrading the fans since it’s a night and day difference.
You will spend approximately $80 or so doing it, and even though this might be a lot considering the low cost of the printer, It’s definitely worth while.
I hope this information was useful!
Have a great day!
Check out our recommended products section

We created a recommended products section that will allow you to remove the guesswork and reduce the time spent researching what printer, filament, or upgrades to get, since we know that this can be a very daunting task and which generally leads to a lot of confusion.
We have selected just a handful of 3D printers that we consider to be good for beginners as well as intermediates, and even experts, making the decision easier, and the filaments, as well as the upgrades listed, were all tested by us and carefully selected, so you know that whichever one you choose will work as intended.
Error processing API data.
Hi! Great article! Where did you hide the LM2596 Buck Converters? Thanks.