One of the first questions we ask ourselves when getting into the 3D printing world is “How fast can I print XYZ?” The answer can range from just a few minutes to more than 24 hours, which is obviously not the most useful statement you heard in your life. Nonetheless, I can add some useful information to this mediocre, unfulfilling and probably pedantic answer.
The time it takes a regular desktop (hobbyist) printer to finish a model depends mainly on the extruder movement speed, the layer height, the line width, the percentage of infill and the need (or not) for supports. It goes without saying that the most important determinant is the sheer volume of the object we want to print.
If all you want is a clear and specific answer, the time it takes to print a 13-gram and 15.5cm3 Benchy is approximately 60 minutes using average printer settings.
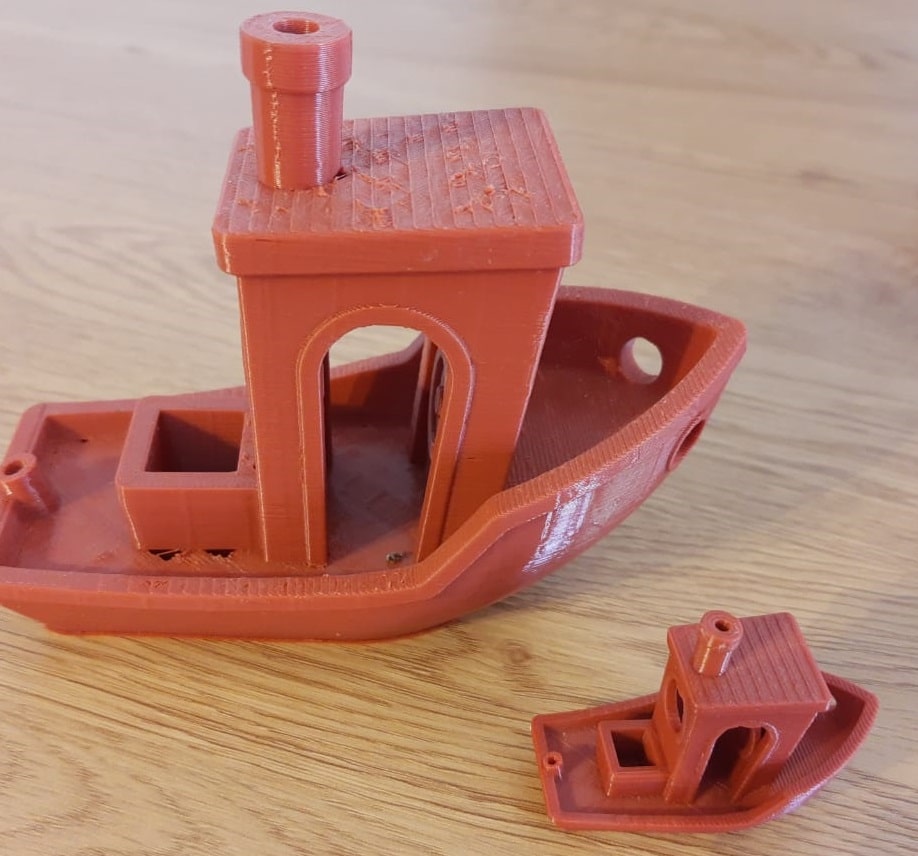
On the back: a huge Benchy printed as a way of testing new ways to waste expensive filament
The Benchy is the favorite boat printed by hobbyists in order to benchmark printer quality. I am not the exception, which is why I will be using it as an example for the rest of this article.
Now that you already know what to tell your friends when they ask you how long it takes to print a small random and useless boat, we could technically stop writing/reading this article and go on with our lives! In the not so probable case that you choose to stay and keep on reading, I will try to make it worth your while and give you a few more things to tell them. Let us make sure you leave them speechless (or bored to death)!
Main determinants of 3D printing speed
We will talk in more detail about each one of the main drivers of print duration, and if you want to test the impact of each one of them, you can download a slicer (like Ultimaker Cura). By changing each parameter and slicing, the software will output an estimated print duration. You do not even need to have a 3D printer to do this.
In fact, let us build a table of different print durations of our friendly Benchy under different printing speeds and layer heights! As a starting point, I will use Cura’s draft settings:
Benchy’s printing duration (in minutes)

As you can see, settings play a huge role in determining printing time. In our simple example, we can expect to obtain a Benchy in only 37 minutes or in as much as almost three hours. It is also worth noting that the fastest printing scenario that we considered should yield an acceptable looking Benchy.
You can do the same by downloading Benchy from Thingiverse.
Extruder movement speed
For obvious reasons, the speed of the extruder movement is one of the main factors that determines the overall time it will take our printer to output our desired piece of plastic. It has a linear relationship with printer speed, meaning that if we double the movement speed we will roughly halve our printing time.
There is no free lunch here, however. We cannot increase the printing speed ad infinitum and expect our little boat to remain as beautiful as always. Depending on the printer, we can expect to obtain good results setting the movement at 50mm/s. Some higher end FDM printers can print at 150mm per second without too much of a print quality decrease.
If you want to find out the perfect maximum speed of your printer, you already have a reason to start printing your own Benchy boats. Start at 35mm/s and, if successful, increase the next print by 5 or 10 millimeters per second until you find the sweet spot.
If you choose to force your printer to move like Usain Bolt, it will not explode but you have to be willing to see some ghosting/ringing, under-extrusion, weak layer adhesion and overall poor quality, since increasing the speed does come with its inevitable downsides.
Layer Height
Another feature that has a roughly linear relationship with printing time is the layer height. Doubling your layer height from 0.1mm to 0.2mm will reduce the time you stare at your printer by 50%.
* Not-Really-Pro tip: instead of only looking at your print materializing, you can also go outside and stare at the grass (it also changes in size, albeit much slower).
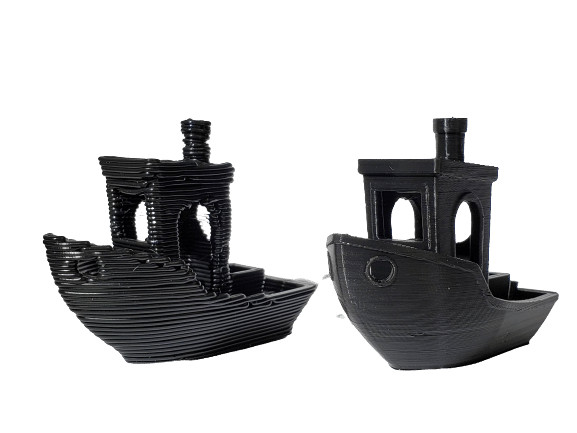
Left: Another Benchy, not as lucky as the first one. Printed on borderline illegal layer heights.
For the standard nozzle size of 0.4mm, a well-calibrated 3D printer should be able to print at 0.05mm layer height. The results of pulling this off can be incredibly rewarding. Small layer heights are especially suited for hobbyists interested in printing small and detailed miniatures.
If you want to take printing detail quality a step further, consider changing your 0.4mm nozzle for a 0.25mm one. This quick and low cost change can yield incredible results.
On the other hand, If you have the patience of a five year old toddler (or me), you can set the layer height up to 0.32mm with the same nozzle and complete your prints in no time.
Infill percentage
I recommend to usually adding an infill to most of our prints in order to make them more resistant. Of course, as is the case with most settings of a print, infill percentage also comes with potential drawbacks: it requires more filament and takes longer to print. This is especially true for models that have a lot of interior volume.
In the picture below, I show how different infill percentages look like. As time goes by and you become more experienced in printing and tweaking settings, you will conclude that a 12% to 20% infill is enough to get a sturdy and resistant print without adding to much printing time to the job.
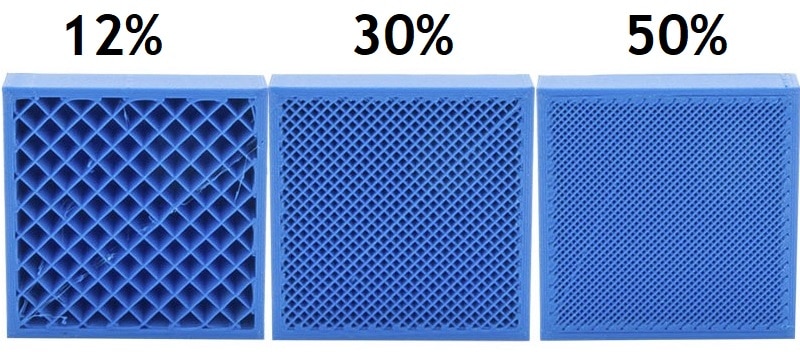
Middle: print with 30% infill
Right: trying to print a worthy opponent to fight a Nokia 1100
You should stay within the 0% to 60% infill range. Percentages above that threshold tend have little to no strength gains, and at the expense of obscene print times. As an estimate, the 0% to 20% range is suitable for non-functional parts, while the 20% to 40% range is where most of the light to heavy use prints will be. There are rare exceptions that call for a 60% infill, so avoid this magnitude unless you clearly think it is necessary.
If you want to look at a print that clearly failed because of (among other reasons) weak infill, check out the huge Benchy of the first picture I took.
Print Supports
Because of the way that Fused Deposition Modeling (FDM) works, there is a maximum angle that a model can be printed at before the print starts to fail. This is because each new filament layer is deposited on top of the previous layer, making it a requisite to have something below to build upon. As a rule of thumb, I recommend not to print objects with angles greater than 45° without adding supports.
To provide a reference, below is a render of a popular angle benchmark tester:
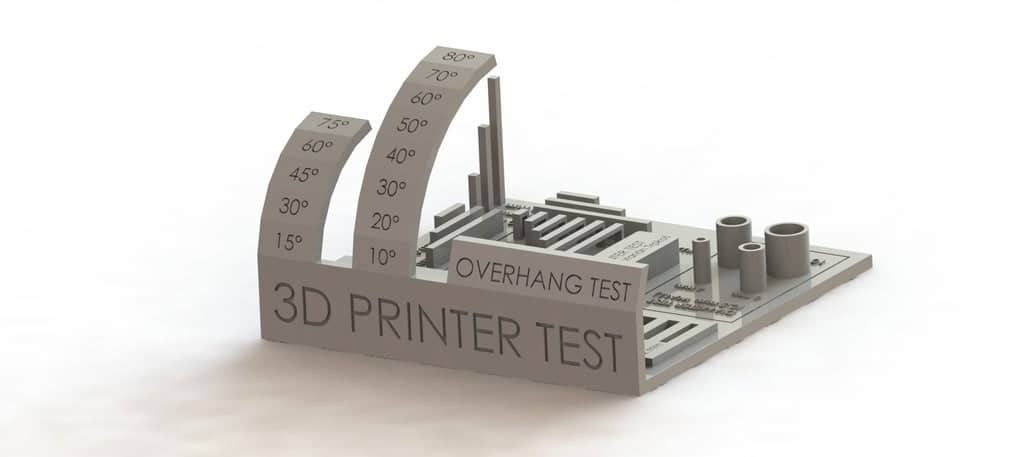
In addition to showing the “overhang test”, I also recommend printing it in order to determine at which angle your printer starts to fail (download here). It is also worth considering that there is always room from improving a few degrees without adding supports.
An experienced printer will also be able to set the most efficient positioning of a model inside the slicing software. Most of the times, you can get by without supports by simple rotating the model.
Wall thickness of a 3d print
Unless you want to print in Vase-Mode (where only the outer part of the model gets printed in one continuous line), it’s also important to know the tradeoffs of wall thickness. By Wall Thickness, I mean the number of adjacent filament depositions the extruder makes on each outer part of the print in order to “build the wall”. This parameter will have two main consequences:
- Greater wall thickness equates to a more resistant and nicer looking print.
- A print with thick walls will take more time to print and consume more filament.
Many 3D printer settings have more than one way by which they are called and wall thickness is definitely not the exception: depending on the software, you can find it under shells, perimeters, sides or loops.
The shell thickness of your print is also determined by your nozzle size and you should always try to set it as a multiple of the nozzle diameter (0.4mm is the most popular).
Both the minimum and the recommended settings that I describe below apply not only to PLA filament, but also to ABS, Nylon, PETG, and every other filament.
If your walls are too thin, it is possible that the print will not even finish. Since FDM technology consists of printing each layer on top of the previous one, a thin layer that has not yet solidified is prone to collapsing when laying the next layer on top. As an absolute minimum, it should be 0.8mm thick (two perimeters). This is a good setting for a print that is not the definitive but only an intermediate test of your iterative design process.
Exaggerating thickness can also be counterproductive, since it will create more internal stress and can lead to warping. If you have durability and overall printing quality in mind, you should consider a 1.6mm thick wall consisting of four perimeters.
Conclusion
3D printing is not fast, in fact it’s slow as hell, but we can increase the speed at which our printer works by tweaking the settings a little bit.
There are a couple modern printers out there that are capable of printing a lot faster than the standard 50mm/s speed that most printers print at, such as the Voron 2.4 which can print at up to 350mm/s (yes, 7 times faster) and with fantastic quality.
Most makers opt for printing overnight, especially with prints that take about 20hs or so, just make sure to take the necessary precautions when doing so.
Check out our recommended products section

We created a recommended products section that will allow you to remove the guesswork and reduce the time spent researching what printer, filament, or upgrades to get, since we know that this can be a very daunting task and which generally leads to a lot of confusion.
We have selected just a handful of 3D printers that we consider to be good for beginners as well as intermediates, and even experts, making the decision easier, and the filaments, as well as the upgrades listed, were all tested by us and carefully selected, so you know that whichever one you choose will work as intended.
Error processing API data.
