Printing can come with it’s fair share of difficulties, and poor bed adhesion and having a badly printed first layer are definitely part of those difficulties.
A Skirt, Brim and Raft can definitely help with providing a better first layer adhesion, prevent warping (not the skirt really, but I’ll get into that shortly), and more.
In this article, I will go over all the differences between rafts, brims and skirts, and tell you when each one should be used and why, their pros and cons, how to use select them in the slicer and adjust the settings, and much more!
So, what’s the difference between a Skirt, a Brim and a Raft? A Skirt is a number of printed lines surrounding the model that serves to prime the extruder, but it doesn’t touch the print. A Brim is identical to a skirt but wider and it also helps with bed adhesion because it connects to the print, and a raft is a printed platform where the model gets printed on that also helps with adhesion.
What is a Skirt?
A Skirt is an outline that’s extruded surrounding the model that’s about to be printed without coming into contact with the print itself. It’s designed to prime the extruder and to achieve a smooth flow of material before the print even starts, but it doesn’t support the print in any way.
In addition to this, a skirt will help you identify another problem before the print even begins, which is if the bed is badly leveled: If the lines of extruded plastic aren’t sticking too well at a certain part of the print or if they are getting squished too much, you probably need to re-level it or you can do this while the skirt is being printed if you’re fast enough.
When to use a Skirt?
Using a Skirt is advisable for any print because priming the extruder helps you achieve a much better first layer, and having a first layer that adheres well to the build plate ensures that the rest of the print succeeds without detaching from it.
It also helps you find out if there are any issues such as having a poorly leveled bed, if there’s some under-extrusion going on, etc. before the print even starts, which saves time and filament.
However, you may consider using a Brim or a Raft (more on these two in a second) if the base of the object you’re printing is too small and is detaching from the build plate, since even if you use a Skirt and the extruder is properly primed, the contact surface area may be too small to adhere properly to the bed.
I generally use a skirt, especially when printing objects that have a fairly large base, such as a benchy, for example. But if you start a print and it doesn’t stick too well, consider trying it with a Brim.
Pros
- Primes the nozzle.
- Insures proper material flow.
- Allows you to detect if the bed needs to be leveled (can be adjusted while the skirt is being printed).
- Low material usage.
Cons
- Doesn’t increase the contact surface area of the print, providing no support and not improving bed adhesion.
Skirt Slicer Settings (Cura)
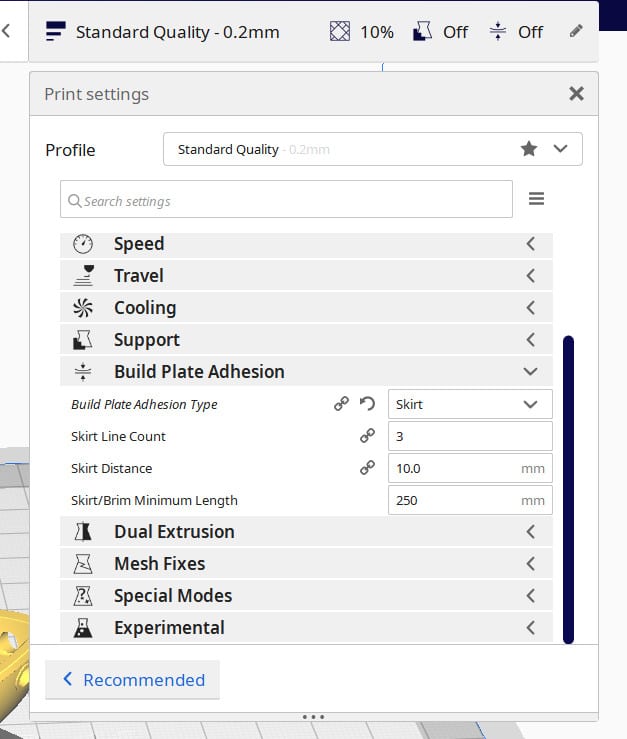
Most Slicers, such as Cura, tend to have the Skirt automatically enabled for all prints, but if it’s not enabled then follow these steps:
- Go to “Print Settings” and then “Build Plate Adhesion” and select the Skirt.
- Adjust the Skirt Line Count (How many lines it will print before starting with the actual print).
- Set the Skirt Distance (Default is fine).
Note: If you don’t see most of these settings, click on the Hamburger Icon next to the search bar and enable “Expert Mode”.
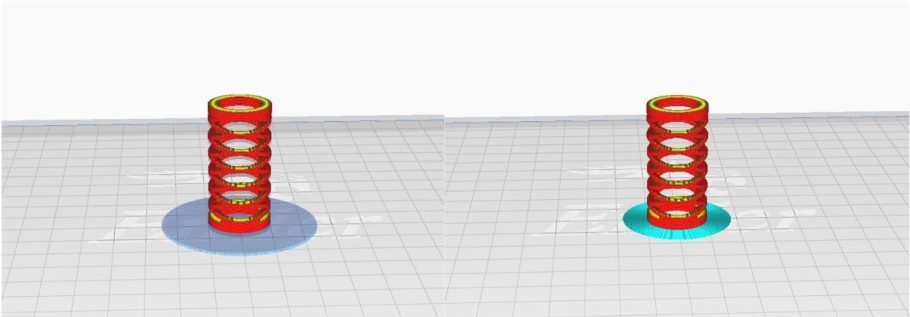
What is a Brim?
A brim is a layer of filament that gets printed around the 3D object and that makes contact with the edges of the model in order to help with bed adhesion and to prevent warping. A Brim doesn’t reach below the print like a raft does, but rather only makes contact with the outer walls of the print.
Essentially, you could think of a brim as being the exact same thing as a skirt that makes contact with the print itself and increases the contact surface area to improve bed adhesion.
Difference between a Skirt and a Brim
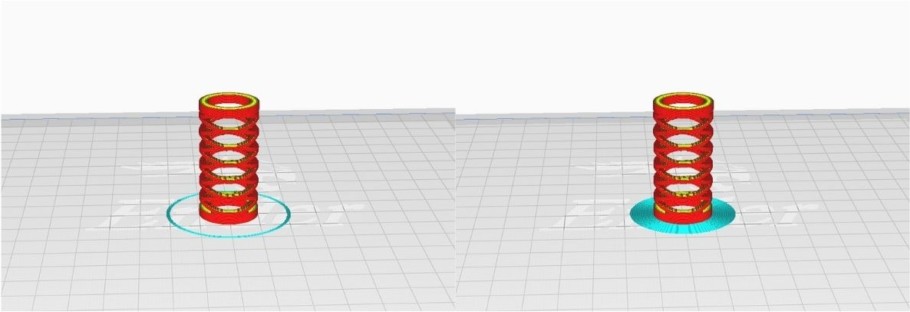
Right: Brim.
A Skirt and a brim are practically identical since they are simply a series of extrusions made around the 3D model, with the only difference being that the brim comes into contact with the 3D model to help it adhere better to the build surface while the skirt doesn’t.
Both consist of just one layer of plastic printed around the model, with the skirt generally having a total of 3 Lines (lines = how many lines of plastic are printed one next to the other, not on top of the other) while the brim usually has a much higher line count, generally around 20.
When to use a Brim?
A Brim should be used whenever a better bed adhesion is required since it can help with warping and with keeping prints from detaching from the bed because it increases the contact surface area of the print.
If your print requires just a few supports for a small part at the top of the print, use a brim to help those small supports stay firm and well adhered to the bed.
Another huge reason to use brims is when printing objects that have a small base since these generally have a much harder time adhering to the bed.
For example; I generally use it when printing objects that have small parts that are first printed separate from the rest of the print since they tend to not stick well to the bed, such as the feet of this spaceship.
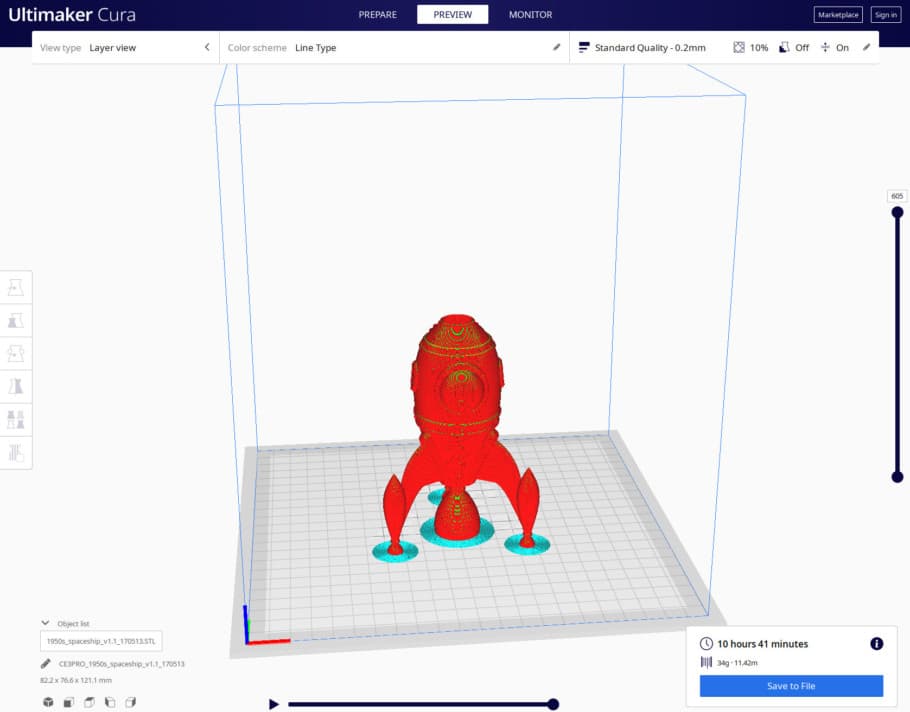
This print is very hard to get right without a brim, but a cakewalk with one.
When to use a Brim:
- Prevent Warping.
- Improve Bed Adhesion.
- Strengthen the supports.
- Prints with a small base.
Pros
- Improves bed adhesion of the print.
- Prevents Warping.
- Let’s you diagnose problems with adhesion and if the bed is poorly leveled, same as with the skirt, and you can adjust this while the brim is being printed.
- Easy to remove and doesn’t leave as big of a mark as a Raft.
- Uses less material than a Raft.
Cons
- Uses more material than a Skirt.
- May leave a small mark that needs to be sanded to get a smooth finish (generally not too noticeable).
I would highly recommend a brim over a raft whenever you can since it only attaches to the edges of the print and not the bottom as well, which is easier to remove and leaves almost no marks, however, it doesn’t provide as great of a bed adhesion as the raft.
Brim Slicer Settings (Cura)
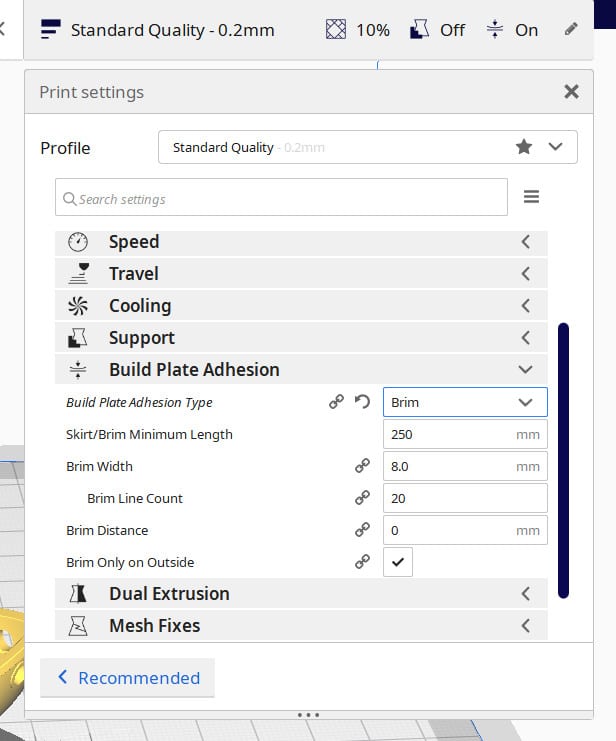
To access the Brim settings, click on “Print Settings” and then on “Build Plate Adhesion”.
- Under “Build Plate Adhesion Type” select the Brim.
- Adjust the Brim Line count (Generally 20) and the Brim width (Generally 8mm).
- Choose if you only want the Brim to be on the Outside (Recommended), but having it on the inside is also possible for even more adhesion.
Note: If you don’t see most of these settings, click on the Hamburger Icon next to the search bar and enable “Expert Mode”.
What is a Raft?
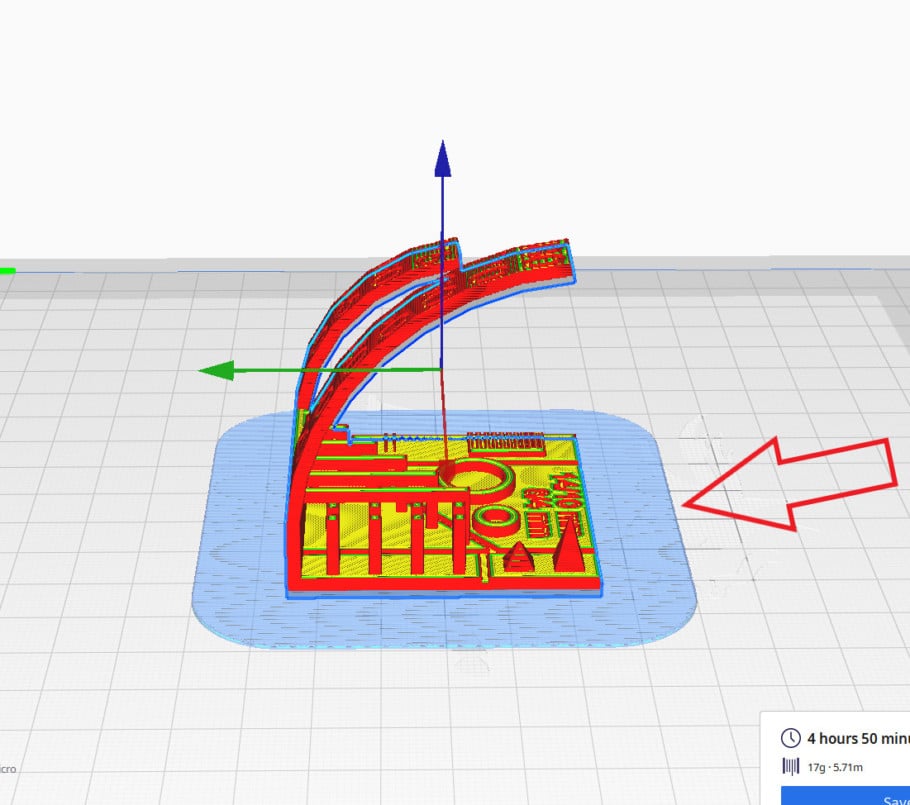
A Raft is a grid-type surface that’s printed directly onto the bed of the 3D printer and that’s used as a base to print the 3D model on, and it allows you to get the first layer of the print right and also to keep it from detaching from the build surface.
Essentially, a raft works as a platform that you use to print the model on, and since getting the first layer exactly right can be quite difficult, especially with printers that have manual bed leveling, printing with a raft can get rid of some common issues, such as the print detaching from the build plate, warping, strong first layer, etc.
Difference between a Raft and a Brim?
Right: Brim.
A Raft is a printed platform that is used to print the 3D model on while a brim is just a series of extruded lines surrounding the model that help it stick better to the bed, but a brim doesn’t make its way underneath the print while the raft does.
When to use a Raft?
The reasons for using a raft are similar to the ones I mentioned about the brim, but a raft would be used in more extreme cases, like for example if you’re printing with a material such as ABS that tends to warp a lot, since it will further help avoid this issue.
Remember the image of the spaceship I linked earlier? Well, if for some reason those tiny legs don’t adhere to the bed even when using a brim, a raft will make certain that they do! Essentially, if the part has a small base/bases, then a raft will almost completely remove the risk or the print detaching from the build plate.
Essentially, a raft should be used whenever a better bed adhesion is required and a brim isn’t enough.
However, keep in mind that a raft will adhere very strongly to the print and removing it will leave loads of marks, and you even run the risk of actually breaking the model while trying to remove it.
When to use a Raft:
- Prevent Warping.
- Improve Bed Adhesion.
- Prints with a small base.
Pros
- Very strong bed adhesion.
- Helps with warping (the raft might warp, but not the print).
Cons
- Difficult to remove.
- Possibility of damaging the print while removing it.
- Uses a lot more material than a Skirt or a Brim.
- Leaves a lot of marks once removed (not ideal for prints that need to be aesthetically pleasing).
Raft Slicer Settings (Cura)
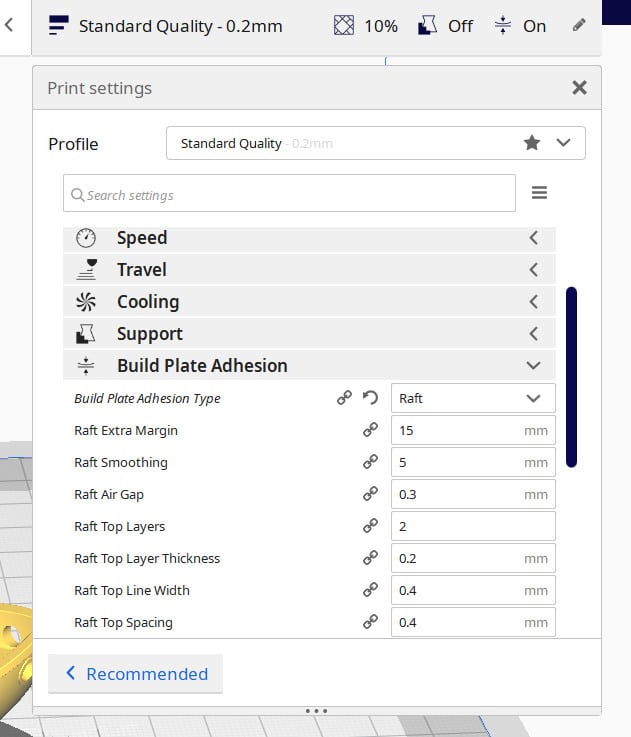
To access the Raft settings, click on “Print Settings” and then on “Build Plate Adhesion”
- Under “Build Plate Adhesion Type” select the Raft.
- Adjust the Raft Air Gap (how much the first layer will be raised or lowered to determine how strongly it will adhere to the raft).
- Use at least 2 or 3 Top Layers for the raft for a better and smoother finish.
Note: If you don’t see most of these settings, click on the Hamburger Icon next to the search bar and enable “Expert Mode”.
There are many other settings but these are the ones that I feel are the most important and the only ones you should worry about.
Time and Material Consumption when printing with a Skirt, Brim and Raft
I was curious about this myself since I had never really compared the time it takes to print with a Raft, Brim and a Skirt, as well as the difference in material consumption, so I went into Cura and sliced a couple different models to see for myself.
I decided to slice our trusted old benchy a couple times, and here are my findings;
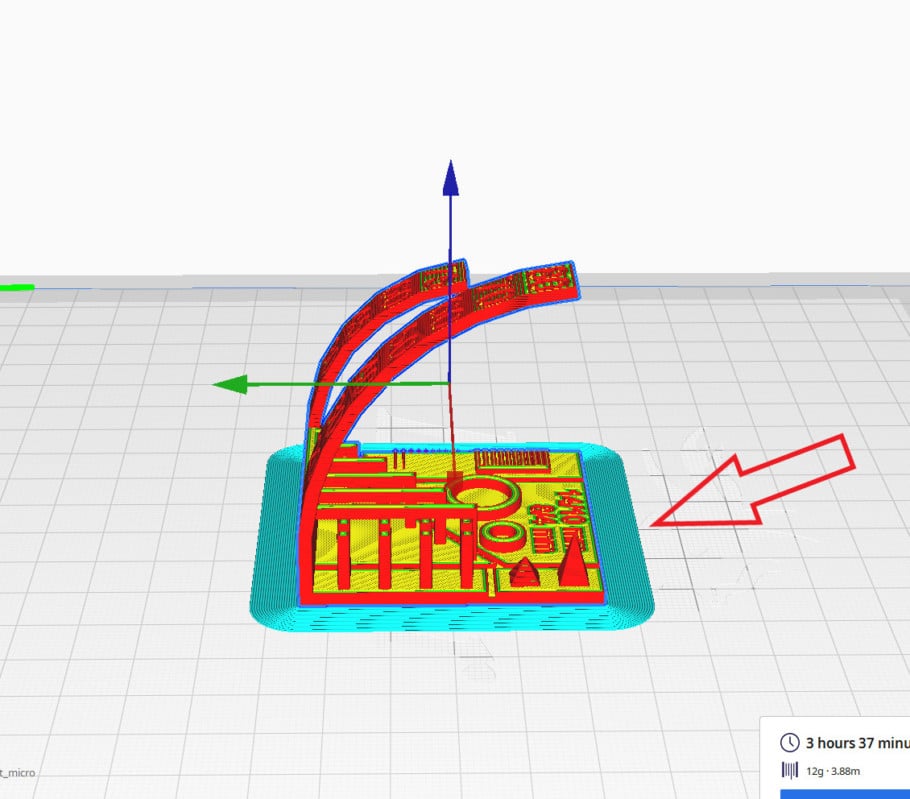
Skirt
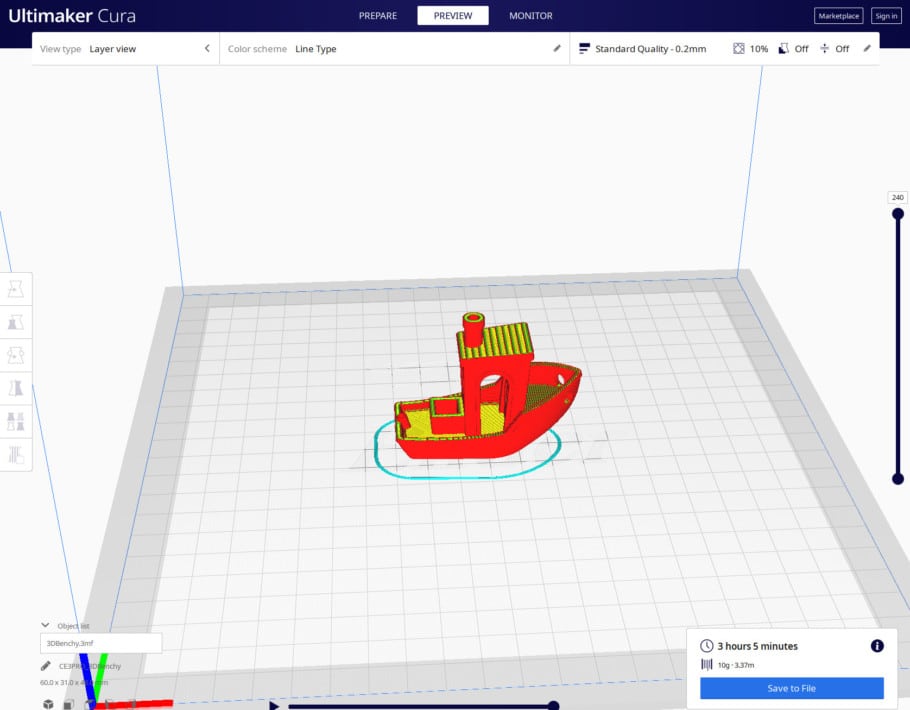
The time it takes to finish the print is 3 hours and 5 minutes, and the material that’s going to be used are just 10g of filament (3.37 meters).
Brim
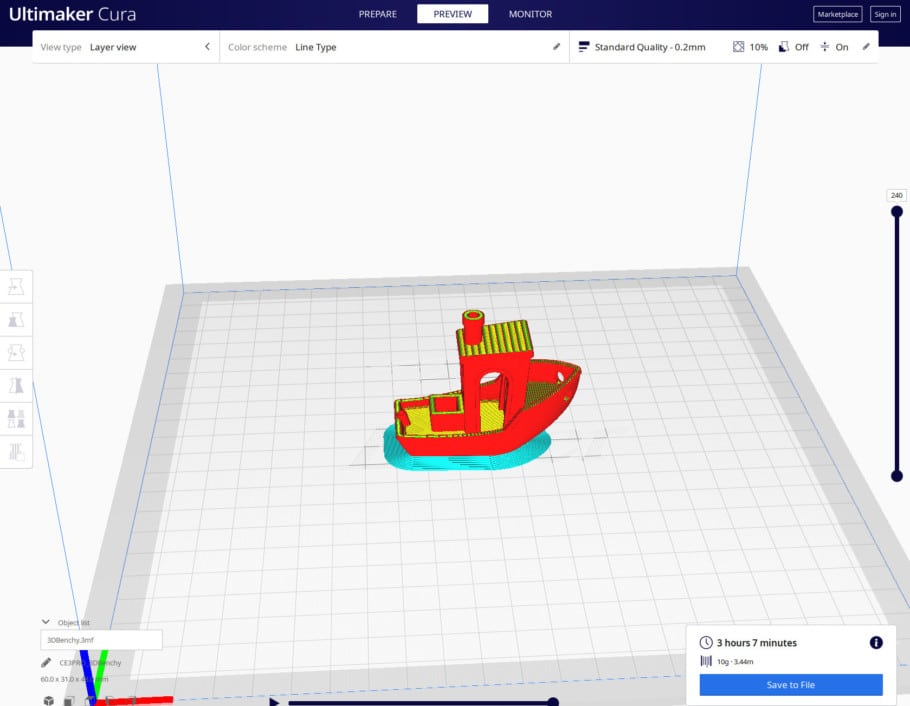
Printing the same Benchy but with a Brim would take 3 hours and 7 minutes, so not much of a difference timewise, and also 10g of filament (3.44 meters).
As you can see, using a brim or a skirt doesn’t really affect print time nor material usage.
Raft
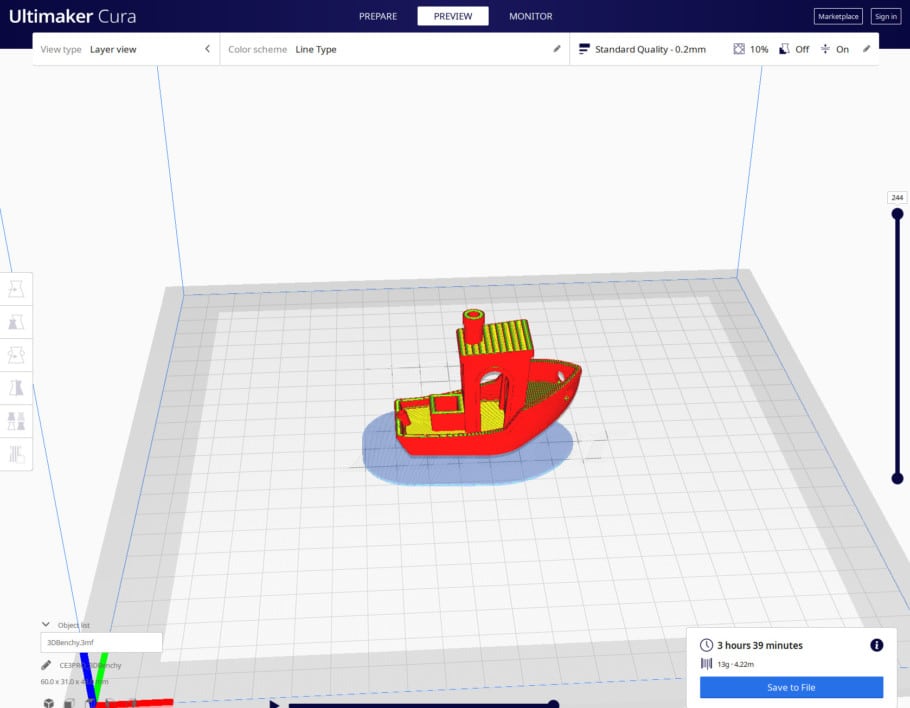
The results here were as I expected since printing with a raft does require the use of more material, I just didn’t imagine that it would be this much.
It would take 3 hours and 39 minutes to finish the print, so about a 10% longer than printing with a skirt or brim, and 13g of filament (4.22 meters) which is close to 30% more.
Note: Using a raft won’t increase the material usage by that same percentage for all prints since this highly depends on the print itself; A narrower but taller print will require substantially less material for the raft than a print that has a much larger base.
Some Frequently Asked Questions
Which one is better for adhesion? A raft serves as a platform on which to print the 3D model, providing a strong adhesion to the bed as well as serving as a good foundation for the print itself. It provides a much better bed adhesion than a Brim and also prevents warping much more.
What’s better, printing with a Raft or a Brim? The only reason to use a raft over a brim is if the print isn’t sticking to the bed or if it’s warping too much, since removing a raft can cause damage to the model and leave marks.
How many layers should a raft be? The top layers of a raft are the ones that serve as the building platform for the print and there should be at least 2 or 3 top layers for optimal results since 1 layer doesn’t result in such a smooth finish of the print.
Do Resin prints need rafts? With resin printers, a support structure similar to a raft (called PAD) is used to avoid the part from detaching from the build plate, especially when the print is in its advanced stages since that extra weight may cause it to detach.
Conclusion
For most prints, I’d recommend going with a skirt. If you properly leveled the bed then you shouldn’t have too much of an adhesion problem.
However, using a brim is a great way of increasing adhesion and dealing with warping (not as much as using a raft though) especially considering that it’s easy to remove, won’t risk breaking the model and doesn’t leave too much of a mark.
If using a skirt or a brim don’t manage to keep your print from detaching from the build plate or from warping, then try using a raft. Just remember that rafts have a lot more cons than the other two because removing them isn’t simple at all and doing so may cause damage to the print.
I hope this information was useful!
Have a great day!
Check out our recommended products section

We created a recommended products section that will allow you to remove the guesswork and reduce the time spent researching what printer, filament, or upgrades to get, since we know that this can be a very daunting task and which generally leads to a lot of confusion.
We have selected just a handful of 3D printers that we consider to be good for beginners as well as intermediates, and even experts, making the decision easier, and the filaments, as well as the upgrades listed, were all tested by us and carefully selected, so you know that whichever one you choose will work as intended.
Error processing API data.