3D Printing definitely comes with its vast number of issues and problems you need to solve, and when you’re dealing with dual extruders it’s even more complicated.
This is why I decided to create this guide where I go over how to deal with most dual extrusion problems such as Oozing, Stringing, infill overlap, and how to use a Prime Tower and Ooze shield.
So, without further ado, let’s get into the guide!
What is a Dual Extruder?

When talking about using a single extruder, I’m referring to a 3D printer that can only print using one filament at a time since it only has a single nozzle through which it can print, and you can only print with one material at a time.
Now, the dual extrusion method works the same way, with the only difference being that there are two extruders and two nozzles available for printing, and therefore you can use two different materials/colors to print with at the same time.
Dual extruder printing problems
Printing with dual extruders definitely has its advantages, but the reality is that it also comes with some downfalls. So, let’s mention some of them now:
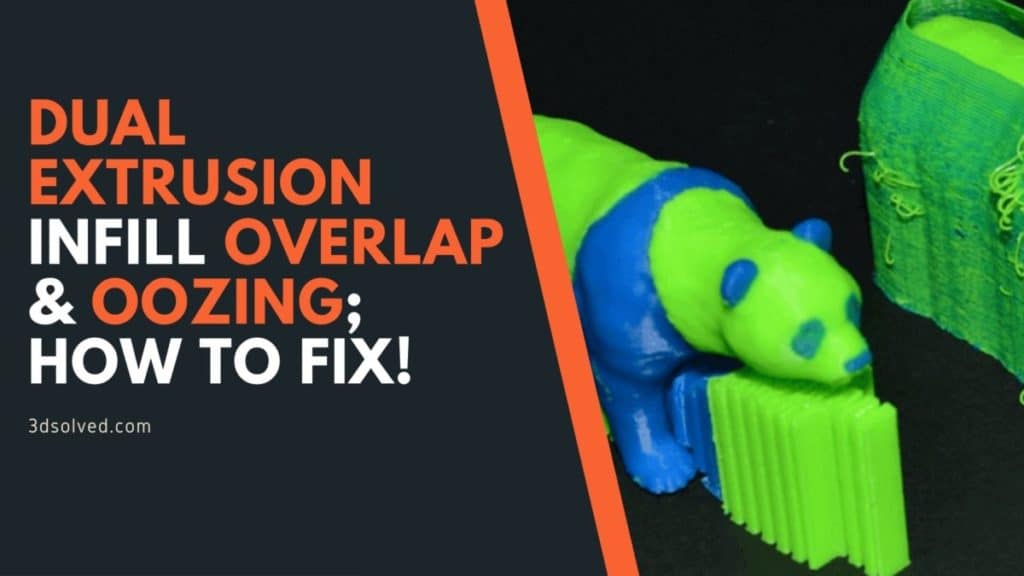
Oozing and stringing

When using a dual extruder 3D printer, one extruder is printing while the other one isn’t, and depending on what color you need, the printer will use one or the other.
In other cases, some of the filament left in the nozzles may start to ooze out onto the model when the extruder is moving to a new location, leaving glue-like strings of filament on it.
This is why the surface of your print ends up looking rough and full of strings, and there are a couple of reasons for this; The temperature may be too high, the retraction speed and distance of the plastic inside of the nozzle may be set incorrectly, and the movement speed and distance of one printing location to the other will also determine how much plastic is allowed to ooze out.
Layer shifting

Layer shifting occurs when the layers of your 3D print don’t align properly, leaving behind a staggered, “staircase” look, and this happens because 3D printers have an open-loop control system, which means that they don’t receive feedback about the location of the toolhead and they simply move to specific coordinates to print each section.
Bumping against the printer, for example, may move the toolhead, but the printer has no way of knowing that this happened, so it will continue printing, but in a different location.
Most of the reasons for layer shifting are hardware-related, and by this I mean that the screws holding the pulleys in place may be loose, and additionally, the belts, which are your printer’s motion system, can also stretch out over time.
If the belts have been stretched, check if your printer has built-in tensioners or print ones yourself!
Another reason that may be causing the layers of your prints to shift, is the printing speed itself; If you are printing at a very high speed, the motors for your 3D printer may not be able to keep up.
Moving the printer faster than the motors can handle will typically result in a clicking sound as the motor fails to achieve the desired position. If this happens, the remainder of the print will be misaligned with everything that was printed before it, resulting in that staggered look.
How to enable dual extrusion in the slicing software
There are different procedures to enable dual extrusion on different slicers. Here I will cover how to set it up on Cura, Simplify 3D and Ideamaker.
Cura
To enable dual extrusion in Cura, you first need to add your dual extruder 3D printer to the slicer by going to Preferences, and under “Printers” click “Add” and you will be able to add your printer if it hasn’t been added automatically.
Click on your newly added 3D printer and then click on “Machine Settings”.
A new window will pop up where you will be able to input your preferred settings for each of your two extruders.
Under the “Printer” tab in the window that just popped up, make sure to set the “Number of Extruders” option to “2”. This means you have enabled dual extrusion in Cura.
You can now go ahead to configure them individually under the “Extruder 1” and “Extruder 2” tabs.
All that is left now is to assign your 3D models to the extruder you want each of them to print from.
Simplify 3D
To enable dual extrusion on simplify3D, make sure your dual extruder 3D printer has already been added to the slicer.
You can do this by going to the “Configuration Assistant” which can be found under “Help” in the menu bar.
To be able to assign each of your models to the extruder you want them to print from, you have to use the “Dual Extrusion Wizard”, which can be found under “Tools” in the menu bar.
Make sure to check the “Group and align models” box while assigning your models.
You can also go further to individually configure your extruders. This can be done by clicking on “Edit Process Settings” which is on the bottom left corner of the home screen of your slicer.
Ideamaker
Enabling dual extrusion on Ideamaker is really easy; First thing is to make sure your 3D printer has already been added to the slicer by utilizing the “Configuration Wizard”.
This “Configuration Wizard” can be found in the drop-down menu when you click on “Printer” which is found on the menu bar.
Under that same drop-down menu click on “Printer Settings” and a new window will pop. In this new window, change the “Extruder Count” to “2”.
By doing this, you have enabled dual extrusion on your Ideamaker slicer. You can go ahead to make other necessary settings for your printer and extruders under this window.
Dual extrusion settings for higher quality prints
To prevent some of the problems I mentioned earlier, there are a couple of things you can do, such as using a Prime Tower and an Ooze shield, and the great thing is that these are really easy to set up in most slicers.
Prime tower

A prime tower is an extra print that is designed to help prepare the nozzle before printing another layer. It works by reducing oozing, under extrusion, and it also increases the overall sturdiness of your 3D prints.
It basically works by letting the nozzle extrude plastic to prepare itself to be able to print your models more accurately by purging the filament left inside of it and allowing new filament to be used.
How to enable the prime tower
In Cura you just need to go to the printer settings, and under “Dual Extrusion” simply check “Prime Tower“. And that’s it!
In Simplify 3D it should automatically create a prime tower when printing with two extruders, and you should be able to see this once you preview the print.
In Ideamaker you need to go to the Advanced Settings” and under “Ooze” you can check the “Wipe Tower”.
Here are some additional considerations regarding the Prime Tower and its settings:
- Prime tower size: This controls the size of the prime tower. Use a larger X/Y axis for a more stable prime tower.
- Prime tower minimum volume/thickness: This is the thickness of the entire prime tower. It must be thick enough to enable the nozzle to prime effectively.
- Prime tower X/Y position: You have to position your prime tower in such a way that it is close to the print itself.
- Prime tower flow: This is always set to 100% by default. Do not tweak or change it.
Ooze shield

This is an additional layer of 3D printing material that gets printed around your 3D model and which is meant to catch the excess material that may drip from the non-printing nozzle.
It helps prevent colors from bleeding into other colors, and since the nozzle can remove any excess filament on the shield, stringing is not an issue.
How to enable the ooze shield
In Cura you just need to go to the printer settings, and under “Dual Extrusion” simply check “Ooze Shield. And that’s it!
In Simplify 3D it should, by default, have an Ooze Shield enabled when printing with two extruders, and you should be able to see this once you preview the print.
In Ideamaker you need to go to the Advanced Settings” and under “Ooze” you can check the “Wipe Wall”.
Here are some additional considerations regarding the Ooze Shield and its settings:
- Ooze shield angle: Enabling this helps the shield become stronger and to not collapse. A smaller angle means more material is required.
- Ooze shield distance: This is the distance between the shield and your 3D print and it’s used to prevent your 3D print from coming in close contact and merging with the shield.
An Ooze Shield Distance distance of 2mm away from the model and an Ooze Shield Angle of 60° will work well for most materials and 3D printing scenarios.
Dual Extrusion Overlap
You can use these settings to personalize your dual extrusion overlap:
- Enable union overlapping volumes: This would allow two interfering volumes to be recognized and sliced together as one.
- Enable the “remove all holes” settings
- Enable “extensive stitching” to close all spaces in your 3D model
- Keep disconnected faces in order to connect the geometry and perfect the shaping of your 3D model
- Merged meshes setting to 0.0 -0.2mm to reduce over-extrusion
- Remove mesh intersection to prevent double extrusion on the build plate and
- Alternate mesh removal is that setting which enables cura to detect and remove double overlapping meshes. This setting prevents layer warping.
How to fix overlapping issues
One thing you should know about 3D printing is that it is done in layers, and each layer of such printing material is made up of a wall and an infill.
Infill is used to hold the model together, making it very sturdy with even the most fragile of printing materials. The wall determines the shape and structure of the 3D model and it has a different pattern than the infill. This is the reason why you have overlaps in the first place, since the wall pattern is different from the infill pattern. You can fix this by:
- Increasing the outline overlap
- Thickening your printing walls
- Reducing your printing speed
- Employing the regulated and right infill pattern
- Increasing your infill volume and density and
- Regulating your printing temperature
Conclusion
You may have to play around with the settings until you manage to reduce oozing and the overlap issues, but following this guide should get you going on the right track!
I hope this information helped!
Have a wonderful day!
Check out our recommended products section

We created a recommended products section that will allow you to remove the guesswork and reduce the time spent researching what printer, filament, or upgrades to get, since we know that this can be a very daunting task and which generally leads to a lot of confusion.
We have selected just a handful of 3D printers that we consider to be good for beginners as well as intermediates, and even experts, making the decision easier, and the filaments, as well as the upgrades listed, were all tested by us and carefully selected, so you know that whichever one you choose will work as intended.
Error processing API data.