Have you ever noticed some plastic hair in your print going from a wall to another? Or did you find small plastic balls on the sides of the piece? Or maybe some leaks on every layer?
This type of error may occur when the nozzle “leaks”, causing the plastic to flow from the nozzle when we do not want it.
In this article, we are going to learn a little more about nozzle leaking, one of the most annoying and recurring 3d printing problems. We are also going to learn how it originates, which the main causes are, and how to prevent it.
You can identify a leaking nozzle if your prints display thin plastic “hair” or “string” on places where no plastic should have been extruded. This is caused because of too high extruding temperatures and or incorrect retraction settings. Set the temperature according to the filament manufacturer’s specifications. Additionally, you can start by setting the retraction distance to 6.5mm, retraction speed to 25mm/s, and minimum travel distance to 1mm.
We will go deep into every aspect in order to troubleshoot and solve your leaking nozzle, but before we get started, feel free to use the following table as reference:
| Parameter | Description | Baseline Value | Too Low | Too High | Test Model |
|---|---|---|---|---|---|
| Temperature | Temperature at wich the filament gets heated when extruded | Check manufacturers specifications. PLA: 190° to 220°C. ABS: 240° to 270°C. | -Underextrusion. -Nozzle not extruding. | Nozzle Leaking | Temp Tower |
| Retraction: Distance | How many milimeters the filament gets retracted every time | 6.5mm. | -Nozzle leaking | -Clogged Filament. -Underextrusion | Retraction Test |
| Retraction: Speed | How fast the retraction distance will be covered | 25mm/s. | -No improvement -Filament only stretches inside nozzle | -Leave marks on filament | |
| Retraction: Minimum Travel Distance | Minimum travel distance to enable retraction | 1mm. | -Rectracting too often | -Rectraction may never occur |
3D printing problems
As you probably already know, the final shape of a 3d printed object is achieved by moving the extruder by means of a CNC controller. This extruder is fed by a filament spool and can stop extruding when there is an empty space between two positions on the same layer.
If everything is working properly, the result will be a piece of the same measurements in height, width, and depth as the original digital model. It will also have the exact shape of the object previewed on your computer. Preferably, it also will feature few quality imperfections.
Of course, this will not be always the case, especially when you are first getting started or when you buy a new printer that has not been yet properly calibrated.
Among the many errors that can occur, we may find a leaking nozzle, one of the most common problems in 3d printing. Fortunately, solving this problem is possible and easy if you know what causes it.
Why does a nozzle leak?

The extruder is the part responsible for heating the plastic to a temperature that allows it to flow. At the entrance, the filament measures approximately 1.75mm. The extruder then pushes the hot filament into a smaller hole, which can measure between 0.1 and 1mm. The pressure originating inside the extruder makes the plastic flow through the small hole, called the nozzle.
That is the theory of how the extrusion system is supposed to work, either direct or Bowden. Sometimes the material does not come out as it should because the extruder is not capable of feeding correctly or because some setting was not correctly set.
Since 3D printing is all about melting, we should establish temperature as one of the main parameters to consider.
When we select the type of material to be used, it is often that the manufacturer provides us with a data sheet that includes an optimal temperature range for its use. Different materials have different ranges, and even the same plastic from different manufacturers may not be the same.
Always check the datasheet. You can probably find it published on the manufacturer’s website or, if you are lucky, on the back of the filament packaging.
Sometimes, that temperature range is too big, like “190 to 220 °C”. I do not know about you, but that range is not very helpful. How would you choose to dress if the weather forecast informs that tomorrow’s temperature will be between 0°C and 30°C?
Ok, let us go back to the extruder: if the temperature is too low, plastic will not be liquid enough to flow and it will probably get stuck. You can notice this when you see that the 3d printer is supposed to be working but is not extruding filament at all. A typical round scratch is left on the filament where the pushing gear of the extruder is located.
Having a high temperature causes the opposite: plastic gets too fluid and it doesn’t need to be pushed to flow through the nozzle. Its own weight causes the material inside the barrel to start oozing.
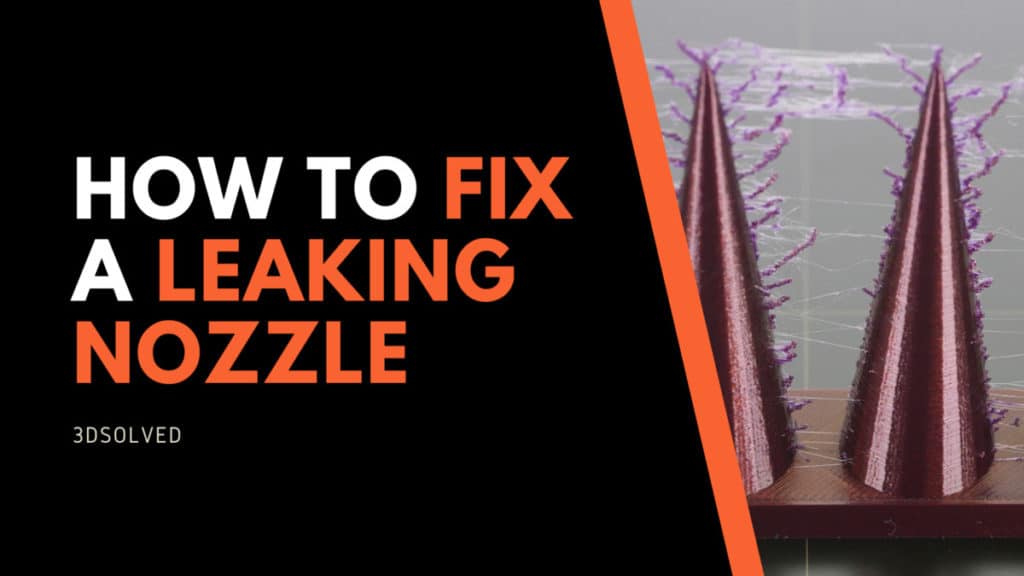
This means that the plastic will flow even when it is not supposed to do so. The nozzle will leave a trail while moving, like a thin plastic “hair” or “string”. That is the reason behind us calling it “stringing”, “hairy prints” or even “whiskers”.
I guess you already know what stringing really is. Nonetheless, if you are not sure and want to compare the problem you are facing with a real case of a leaking nozzle, take a look at the following photo:

At this point, it is necessary to differentiate the leaking that happens when setting a high temperature from the normal leaking during the warmup of your printing. Plastic, like any other material, changes its volume when heated.
Inner pressure inside the barrel increases at the initial heating time, as the filament expands. That is a normal process and you have nothing to worry about.
On the other hand, if the nozzle is empty at the start of the print, the extruder will travel some distance without filament inside. A quick and effective solution is to add some skirt lines before the object starts being printed.
A leaking nozzle may also cause the tip to be empty during the first part of each layer. The extruder gear spins but no plastic gets out from the nozzle. It results in empty lines in the layer seams. The object looks bad, especially in thin areas.
How to solve a leaking nozzle
There two most important parameters that will help us with this problem are the temperature and retraction.

Optimal extruding temperature
In order to find the optimal printing temperature, you can print many pieces only by varying temperature. You will notice the prints are opaque at low temperatures and they get brighter as you set higher temperatures. Pick a point in the middle, with some bright but not too shiny.
Your printer probably also allows you to change the temperature during a print. It is a faster alternative to change the temperature in discrete intervals of 3° or 5° C and let the print run for a few layers.
If you see that the printing quality improves, keep changing the temperature in that direction until it starts to get worse again.
As this method can take a long time, some people already generated G-code files that vary the nozzle temperature every a certain number of layers, so you don’t have to print a lot of pieces.
For example, you can try printing this Temperature Tower from Thingiverse
You could also search for “temperature tower” on our own search engine and choose the one that best fits your printer. There are dozens of specific tests you can try. Be sure to check if the g-code was generated for a similar 3D printer to yours. If you like, you can edit the code to change the settings you need to test.
Remember that high temperature helps with the object’s adhesion to the bed. You can set a higher temperature during the first layers to ensure adhesion, and then reduce it for the rest of the printing time. This is especially useful to keep in mind if your printer does not have a heated bed.
What is retraction?
When printing, the extruder gear spins in one direction, forcing the filament through the nozzle. To avoid leaking, you can set your 3d printer to spin a little distance in the opposite direction when it has to travel to a certain point without extruding. This rotation retracts the filament inside the barrel and removes pressure in the nozzle. If this retraction is set properly, no plastic will ooze during travel and no strings will be left.
You can set three parameters for retraction: distance, speed, and travel distance. Let us find out how they work:
When you set Distance, you specify how many millimeters the filament retracts every time. A small distance will cause the strings to be thinner but it will not stop the problem.
On the contrary, if you set the distance too long, the nozzle will be empty when it resumes extruding, leaving holes as we already discussed.
Also, keep in mind that if you set your printer to retract too much, the filament may get clogged and your print will be ruined.
Retraction Speed sets how fast this distance will be covered. As the melted plastic complies with the properties of fluids, if you try to retract too slowly, the filament will only stretch and no improvement whatsoever will be achieved. However, a fast retraction can also cause problems.
Finally, Travel Distance specifies the minimum travel the extruder has to make when not extruding, before retracting.
Optimal Retraction Settings
Again, there are some ways to solve this, but, in my opinion, calibration tests are the easiest.
This retraction test is my favorite, but you can always choose another just by searching “retraction test” on search.3dsolved.com (our own search engine).
The procedure is easy and straightforward: print the object, change distance and speed parameters (one at a time), and print another until you get a nice print. Each test prints in roughly 15 to 20 minutes, so you will be able to troubleshoot and solve this issue in just a few iterations.
As a good starting baseline, I recommend using the following values:
- Retraction distance: 6.5mm
- Retraction speed: 25mm/s
- Minimum travel distance: 1mm
Another way to prevent stringing is to set a faster travel speed when not extruding. Less time leaking results in fewer strings and better prints.
If you want to learn more about retraction, I wrote an entire post on what settings to use.
Now we know more about nozzle leaking, so it’s calibrate our printers!
Conclusion
Now you not only know how to identify a leaky nozzle, but you also possess deep technical knowledge about the causes of the problem, the solutions, and most importantly, why these solutions work. As you may notice, it always pays off to understand the issues instead of just following a recipe.
Check out our recommended products section

We created a recommended products section that will allow you to remove the guesswork and reduce the time spent researching what printer, filament, or upgrades to get, since we know that this can be a very daunting task and which generally leads to a lot of confusion.
We have selected just a handful of 3D printers that we consider to be good for beginners as well as intermediates, and even experts, making the decision easier, and the filaments, as well as the upgrades listed, were all tested by us and carefully selected, so you know that whichever one you choose will work as intended.
Error processing API data.