As every 3D printing enthusiast that is worth its salt knows, infill is a very important and essential aspect of the quality, strength, and printing time of an object. Sometimes, we waste a lot of hours, electricity, and filament printing an object only to find out that the infill is not actually touching the shell (or walls) of the model, rendering the infill structure kind of useless.
In this article, I’ll guide you through the reasons that may cause this issue and how to solve it. In a nutshell, what are the causes that lead to the infill not touching the shell or wall of a 3d printed object?
Walls and infill not touching could be caused by under extrusion, which itself can be caused due to low nozzle temperatures, high movement speeds, or improper calibration of the printer, and it can also be fixed by adjusting the infill overlap setting. It’s recommended to raise this setting in 1% increments and test the results.
| Solution | Description | Indication |
| Infill overlap | The percentage that the infill will overlap with the nearest perimeter | Increase it by 2% up to 14% |
| Nozzle temperature | Low nozzle temperatures could lead to under-extrusion. | Set it to the maximum temperature indicated by the manufacturer |
| Movement speed | If too fast, the extruder may not be able to extrude the required filament, leading to under-extrusion | Reduce movement speed to 25mm/s |
| Feeder Problems | Friction in the Bowden tube can lead to under-extrusion | Clean the entirety of the feeding system and adjust feeder tension |
| Calibration Issues | Improper calibration can lead to the printer consuming less filament than indicated. | Calibrate extruder steps or increase flow rate |
Reasons why walls are not touching infill
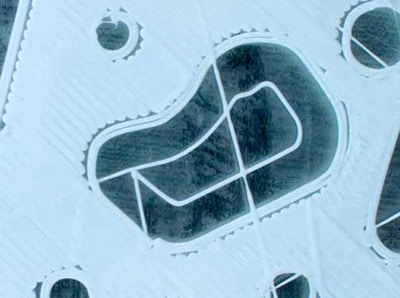
There are a number of reasons that cause the walls of a print not to touch the infill, and to remedy the problem you will have to go through a process of elimination.
Here is a basic roadmap to diagnosing the problem. Once you have confirmed that it is definitely not a print design error, you will need to go through the following systematically.
Slicer settings (Different for each printer profile)
The most obvious things to check are your slicer settings, as this would be the easiest and quickest way to solve the problem.
You will need to look at the Infill Overlap percentage. According to Cura, this setting determines “the amount of overlap between the infill and the walls as a percentage of the infill line width. A slight overlap allows the walls to connect firmly to the infill.“
Apparently, Cura has different default Infill overlap settings depending on the printer profile. On my Ender 3 it’s set to 30%, on some other printers it’s set to 10% or even 0%, so your settings may vary a bit as well.
If your Infill Overlap is already set at 10% (Default Cura setting). I would suggest running a couple tests by with 2% increments every time to see if it resolves the issue; if not, then you can discard this parameter as a possible cause.
In that case, reset the overlap percentage back to the default percentage of 10%, or whatever the default percentage for your printer is, and continue with your diagnostics.
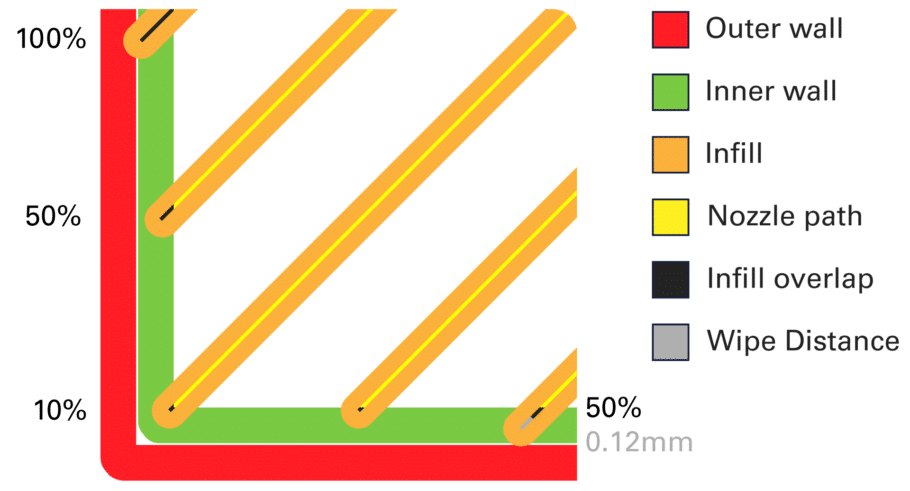
As you can see on the visual illustration above, a setting of 100% infill overlap would mean that the nozzle path would overlap the entirety of a layer width (0.4mm if using the most popular nozzle diameter).
Extrusion Temperature
Your next step would be to check your extrusion temperature. Why could this be a potential cause? Simply put, if the extrusion temperature is too low, the melted filament will be more viscous and impede regular or desired flow from the nozzle as a higher pressure will be necessary for extruding the same amount of material.
This could eventually cause under-extrusion, which could lead to the walls not touching the infill.
If the extrusion temperature is too low, it will also lead to other print complications that include poor layer adhesion and on filament on the same horizontal plane between the walls and infill.
On the other hand, if the extrusion temperature is too high, it would result in a new array of problems. Changes in melted filament will occur if the temperature is too hot and the melted plastic stays in the nozzle for too long, leading to clogging.
Check the recommended temperature indicated by the filament manufacturer on the spool you are using and set the temperature to the spool’s maximum recommended setting. This will help to get the right flow from the nozzle.
For example, if the PLA you are using has a temperature setting of 190-215°C, you should set the temperature to 215°C, check the results and then slowly lower it to find the sweet spot.
Movement speed
Temperature is the leading factor in flow rate; however, the flow rate of melted filament is also defined by the nozzle size, the print speed, and layer height. All these settings together define the flow rate, which is a measurement of how much melted filament is extruded from the nozzle per second.
By trying to push through more material than the flow rate allows, you will end up with under-extrusion. The balance between temperature and the speed of filament passing through your printer to the extrusion point should not be pushed to extremes. There must always be a good balance between the two.
It is true that with a higher temperature, you can print faster. Conversely, while using a lower temperature; the movement speed must be reduced to achieve the optimal extrusion.
Movement speed will differ between printer models, and to eliminate this as a cause you can try and set the movement speed to 25mm/s or at least lower than 50mm/s. This movement speed is low enough to let us conclude that, if the problem persists, it is caused by some other factor.
Under-extrusion
You are right, we already talked about under extrusion previously when going through the nozzle temperature and movement speed. Nonetheless, under-extrusion can also be caused due to other factors that are a little trickier. Because the previous causes would have had straightforward solutions, we discarded them first.
As we already said previously, under-extrusion occurs when your printer is unable to produce the right amount of material required for your print. The obvious signs would be if you notice your printer is skipping layers or is printing thinner than normal layers, or layers that are interrupted and have holes or dots in them.
Once nozzle temperature and movement speed are out of the picture, this is probably one of the more difficult problems to solve because there are many variables to consider. We will run through each one, starting with the easiest to resolve through to the most difficult, and hopefully, you will be able to identify the actual problem and solve it in the process.
Feeder problems
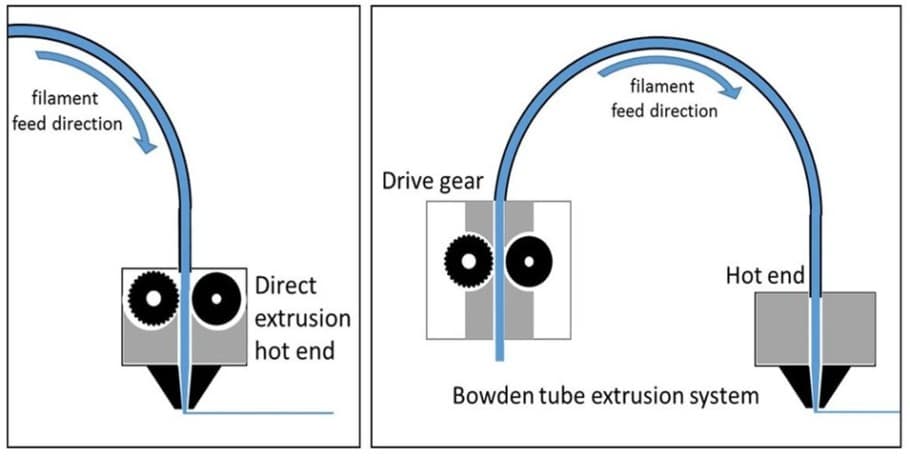
If your printer uses the Bowden tube feed system, then there is a big possibility that your under-extrusion issue could be related to your Bowden tube faltering in the feed process, which includes the hot end.
This could be attributed to either friction in the tube and hot end that impedes feeding, or there is not enough grip on the filament to execute the feed at the correct speed.
To check the feeder tension on your printer, you need to remove the filament from the Bowden tube and examine it for signs that it is being fed through the tube. If the filament is still as smooth as the filament on your spool, the feeder tension is too low, meaning there is not enough grip on the filament to push it through the feeder system.
Like creating a balance for the optimum nozzle flow rate, here, too, a balance must be established. Too little or too much tension in the feeder will result in under-extrusion. We have discussed too little tension; now, let’s look at too much tension in the feed system.
When the filament enters the Bowden tube, it will be squeezed and flattened, resulting in restricted movement. The feeder digs into the filament, which is commonly referred to as grinding, as the process eats away at the filament. The feeder will more than likely begin making a ticking sound and skip back, which is also a sign that there is a blockage in the hot end.
To remedy this situation, you will need to remove the filament from the feeder and clean the entire feeding system, checking the feeder tension in the process. Because this is a hardware issue, it may be different between printers, but to give you an idea of how to approach the problem, check this video on adjusting the feeder tension of an Ultimaker.
Under-extrusion due to calibration
Extrusion calibration determines what the slicer orders your printer to consume and is measured in mm over a predetermined travel distance. If properly calibrated, your printer will really consume the exact same amount of filament.
If the measurements do not match and consumption is less than indicated by the slicer, then the calibration is out and will result in under-extrusion. There are two ways to correct the calibration misalignment, with one method being easy but is temporary, while the other method is more complicated but is a permanent fix.
Permanent fix: calibrating extruder steps
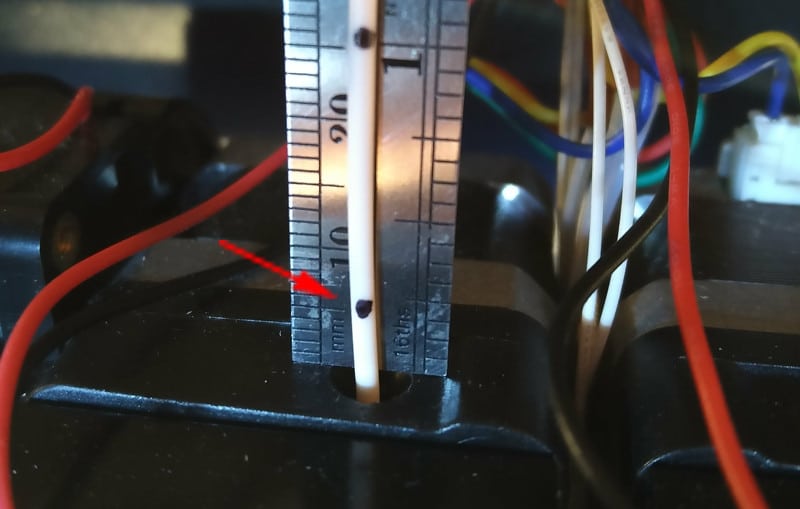
The steps to follow will depend on the printer you are using, but basically, the test follows a set pattern. The object of the exercise is to determine if your slicer instruction is correctly carried out.
Begin by using a Vernier caliper, digital or manual, makes no difference as long as you know how to use it and your measurements are accurate. Have a permanent marker or sharpie handy, so you can make marks on your filament that will not wipe off. You will now measure exactly 100mm or 10cm from the beginning of your extruder and repeat the measurements two more times, so you have three marks at 100mm, 200mm, and 300mm.
Heat up the hot end to about 5 degrees above the filament’s high range just to be sure that the flow is consistent. Now instruct your printer to extrude 100mm (10cm) of material and see if the mark you made lines up at the entrance of the extruder exactly at the beginning of your first measurement.
If the mark you made ends up inside the extruder, your calibration is out, and your printer is extruding more than instructed. This is over-extrusion, and the extra material extruded will squash against the precious layer and drip down the sides of the outer shell of your print. You will have noticed the poor finish of any print you may have printed before your test. In order to correct the calibration, you first need to determine what the incorrect value is so you can make the necessary adjustments on your printer console.
Conversely, if the line is outside and does not line up with the entrance, you are dealing with under-extrusion, and this could very well be the cause of your object’s shell not touching the infill.
In order to solve this, you can calibrate the extrusion steps. You should be aware that this process is not straightforward, so I tend to recommend increasing the flow rate as a proxy to solving this issue.
Easy fix: changing the flow rate
A parameter that must also be checked besides the extruder steps is the flow rate, as it will allow you to directly control the filament flow to the extruder. It’s important to keep in mind the different densities of the filaments you will be using.
The flow rate is influenced by the diameter of the filament in use and the diameter of the extrusion relative to the extruder motor. The test pretty much measures the amount of filament being fed into the extruder.
You will need a caliper and micrometer to accurately measure the variables so the flow rate can be computed using these values. Before you begin with the test, you must make sure that the nozzle on your printer is in a good functional state and contains no build-up of residue on the inside and outside.
Also, check the extrusion temperature of the specific filament you are using and make sure it complies with the manufacture’s recommendations. Lastly, ensure that the base is leveled and calibrated to avoid dimensional deviations along the Z-axis, and be sure to read and understand the test instructions before you proceed.
As previously mentioned, take a Sharpie and make marks on your filament every 100mm. Tell your printer to extrude 100mm and compare it to the markings. If the printer consumed less than 100mm, you can be sure that it is under-extruding.
To fix this, set your flow rate to 102% and perform the test again. If it is still under extruding, further increase the percentage. On the other hand, if you can not see the next mark, it means that it extruded more than 10cm, meaning that reducing the flow rate is necessary. You should repeat this process until your printer is exactly consuming 10cm of filament when you order it to do so.
Conclusion
By now, I hope that you were able to solve the issue that brought you here. With a little bit of luck, you were able to change the Infill Overlap and leave this article. On the other hand, if you made it all the way through the flow rate, I hope you found this information useful. If so, you are definitely very well versed in the art of troubleshooting and solving your printer’s issues.
Check out our recommended products section

We created a recommended products section that will allow you to remove the guesswork and reduce the time spent researching what printer, filament, or upgrades to get, since we know that this can be a very daunting task and which generally leads to a lot of confusion.
We have selected just a handful of 3D printers that we consider to be good for beginners as well as intermediates, and even experts, making the decision easier, and the filaments, as well as the upgrades listed, were all tested by us and carefully selected, so you know that whichever one you choose will work as intended.
Error processing API data.
