The reason I got into 3D printing was to be able to build my own RC car and to print as much of it as I possibly could, which is why I started looking into ways of printing TPU with it since the tires, in order to work properly, need to be made out of some sort of rubbery or flexible material.
Printing TPU on an Ender 3 is definitely doable and depending on what specific TPU filament you get and how flexible it is, you could certainly print it with the stock configuration, however, this is only possible up to a point since the more flexible TPUs will get stuck in the extruder gear.
In this article, I will go as in-depth as I possibly can on how to succeed at printing TPU on an Ender 3, when you can get away with printing with the stock configuration and when you might need to get some sort of upgrade, and I will go over all of the slicer settings, printing temperature, bed temperature, and more.
If you don’t want to have to go through all the trial and error that we did in order to find the Ideal Settings for creating high-quality prints on your Ender 3, then definitely check out our own Cura Profiles tailored specifically for the Ender 3 Printer Series.
So, without any further ado, let’s get started.
Printing TPU on an Ender 3 with the Stock Configuration

All TPU is not the same and there are really flexible ones, like the NinjaFlex which has a Shore Hardness of 85A (the lower the number the more flexible the filament will be and 85A is extremely flexible, almost rubbery like to the touch), while most TPUs out there have a Shore Hardness of 95A to 98A, which makes them softer than something like PLA, but they still aren’t as elastic as a 85A filament.
Essentially, a 98A filament can be coiled up and then it will go back to its original form, but if you try to stretch it, it won’t go very far. A filament with a Shore Hardness of 85A, on the other hand, can be stretched by quite a lot and is nowhere near as stiff as the other filament.
With an Ender 3, or any other printer that has a Bowden extruder, you can certainly print TPU that isn’t too flexible, such as one with a Shore Hardness of 98A, without having to swap out the extruder to a different one (I’d recommend getting this TPU filament if you’re printing on a stock Ender 3).
Here all you need is to adjust the settings in the Slicer to have a different print temperature, printing speed, bed temperature, and completely remove retractions in most cases or lowering them as much as possible.
Ideal Settings for printing TPU with Ender 3 Stock Configuration
Note: Like I just mentioned, this will only be possible when printing with a TPU that isn’t too flexible (NinjaFlex can’t be printed with the Stock configuration).
The lower the retraction the better since clogging and under-extrusion can be an issue when printing with flexible filaments. Unless you’re dealing with serious stringing that you absolutely want to remove, I’d recommend printing without retraction enabled.
What other flexible filaments can you print on a stock Ender 3?
Any filament with a Shore Hardness of at least 90A should work just fine on any Ender 3 without having to change the extruder. So, TPE (90A), Soft PLA (92A), and most other flexible filaments should be able to be printed on an Ender 3.
I’d recommend looking at the Shore Hardness rating of the filament before buying it and making your decision that way, otherwise you might need to upgrade your printer.
Ender 3 upgrades for printing TPU more efficiently
While printing with some types of TPU is definitely doable, printing with the really flexible stuff is something I wouldn’t recommend unless you change a couple parts on your printer.
I just installed the EZR Struder and it works wonders, plus it also works with all other types of filament and you won’t have to go back and forth between it and your old extruder, but there is a free extruder upgrade you can print and install on the printer which also works great!
Printable upgrade (First one you should try)
You can download and print this Flexible Filament Extruder Upgrade for the Ender 3, CR-7 and CR-10 which should let you print with very flexible filaments since it allows you to use a small PTFE insert to close the gap in the extruder that generally allows the flexible filament to get jammed.
Make sure to get the one I linked which is Called “Improved Flexible Filament Extruder Upgrade” since the other ones available on Thingiverse didn’t work for me and caused a lot of under-extrusion, even when printing with PLA, and the Improved version works wonders with all filament types.
How to install the Printable Upgrade
- Cut of piece of PTFE/Capricorn tube of 15mm in length and insert it into the little hole of the pint until it bottoms out (cut it to a point at an angle so that the gear and idler wheel don’t touch it).

- Remove the screw that holds the idler arm in place and remove the whole idler arm.

- Unscrew the Bowden tube from the extruder base.
- Remove the screws that hold the extruder against the motor (Careful since the motor will fall once all screws are removed).
- Install the upgrade using the same screws from the old extruder base (one of them is flat and needs to go on the front/right side since the idler arm needs to be able to move over it).
- Install the idler arm.
- Screw in the Bowden Tube.
EZR Struder

The ERZ Struder can be used with any Ender 3 (Pro and V2 as well), Ender CR10 and CR10 mini and the way it works is by not allowing the filament to tangle or twist when it’s being fed into the PTFE tube, and this means that even the most flexible filaments will work with it since once it’s inside the EZR Struder it’s got nowhere else to go but through the Tube and into the hotend.
Like I just mentioned, the EZR Struder also works with any other filament types, so if you want to print PLA, PETG or ABS with your Ender 3 you won’t need to swap over to the old extruder system.
What I like about this system is that you don’t need to make any major modifications to the printer, just remove a couple screws and install it. The only thing left to do is to insert the PTFE tube into the EZR Struder and you’re ready to go.
How to install the EZR Struder
Installing the EZR Struder is even easier than installing the previous free printed upgrade I mentioned, here are the steps:
- Remove the screw that holds the idler arm in place and remove the whole idler arm.
- Unscrew the Bowden tube from the extruder base.
- Loosen the screws of the extruder gear and remove it (Use the Allen Key).
- Remove the screws that hold the extruder against the motor (Careful since the motor will fall once all screws are removed).
- Install the the EZR Struder by using the same screws from the old extruder base.
- Insert the Bowden Tube into the EZR Struder until it bottoms out and insert the clip that keeps the tube from sliding out.
I wrote an entire article about the EZR Struder, how it lets you print and how to install it.
Direct Drive Extruder

One of the issues of going with a Bowden setup is that the extruder is quite far from the hotend and has to push the filament through the PTFE tube, which of course can cause a couple of issues, especially with flexible filaments.
A direct Drive Extruder will completely remove the need for you to even have a Bowden tube since it’s mounted directly inside of the hotend, which means that it can push the filament straight into the hotend providing a much shorter filament path.
Essentially, it is much better for printing really flexible filaments because the extruder doesn’t have to push the filament through a tube where it might bend and cause too much friction, creating problems.
There is one thing to be said about Direct Drive Extruders, however, which is that they are much heavier and this can cause some vibrations, wobble and loss of accuracy, no matter what filament you’re printing with. Also, the installation process is much more difficult than installing something like the EZR Struder or the printable upgrade.
There might be one more piece of the puzzle that could cause some problems, even though it’s almost never the case but it’s still worth considering swapping out, and that’s the Bowden Tube itself.
Bowden Tube (Not an issue in most cases)
The PTFE tube that comes stock with the Ender 3 can sometimes cause a couple issues because of some variance in the diameter (at least that’s what I have seen online since I didn’t have any issues with mine at all).
Essentially, if you’re printing with super flexible TPU, it might get stuck inside of the tube because it can coil up slightly. In that case, you’ll want to get this Capricorn Tubing which is considered to be much better and it can also withstand higher temperatures.
Note: Replacing the tube without changing the extruder or printing the upgrade I just linked won’t really help, so do that first.
Settings for printing really flexible TPU (NinjaFlex)
Printing with NinjaFlex is quite hard on an Ender 3, if not impossible, but not because of the filament itself but rather because of the way the Ender 3 is built, which is why you should consider at least one of the upgrades I mentioned earlier, otherwise you won’t be able to print this kind of filament.
How is the Print Quality?
I did a couple test prints with my Stock Ender 3 using 98A TPU and once I got all the slicer settings down properly I decided to print an RC car tire, and this is how it turned out:
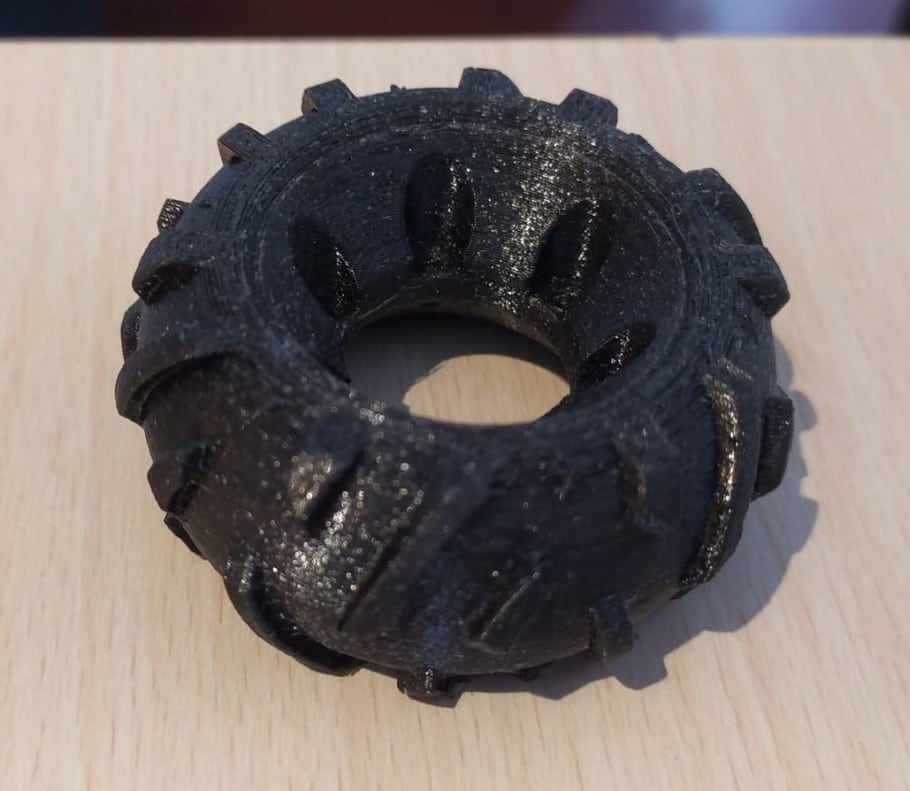
The print turned out perfectly and has a lot of spring to it, I was pleasantly surprised and I didn’t have any issues whatsoever since it stuck perfectly to the bed.
The only issue I encountered was that after compressing the tire a couple times with my hand I started to see some slight layer separation happening, but this was only at one specific spot and didn’t affect the functionality of my print, plus I think that this was caused by me compressing the tire and not by the printer.
Results of printing with NinjaFlex (Can’t be done on Stock Ender 3)
I tested this using the printable upgrade and the EZR Struder as well and to be honest, I was expecting it to be a complete failure and something that would cause me a lot of headaches, but it printed exceptionally well on the first try and I didn’t even need to re-level the bed before doing it… it just worked!

I printed the typical flexible octopus and I couldn’t see any visible delamination or layer separation on both the prints and they came out absolutely perfect, plus the prints did stick amazingly well to the bed as well!
In all honesty, printing with NinjaFlex is quite easy on the Ender 3 and the prints come out great, as long as you install one of the three upgrades I mentioned.
If you don’t want to have to go through all the trial and error that we did in order to find the Ideal Settings for creating high-quality prints on your Ender 3, then definitely check out our own Cura Profiles tailored specifically for the Ender 3 Printer Series.
Conclusion
Printing TPU, especially the really flexible stuff, isn’t something you’ll be able to achieve on any Stock Ender 3, but with just a couple simple modifications you’ll be printing with something like NinjaFlex in no time.
All you need is to print the file I linked earlier, insert a piece of PTFE tube into it and cut the sides off so that the idler wheel and the extruder gear don’t come into contact with it and that’s it! You’re ready to print really flexible TPU.
Of course, there are some advantages of going with a Direct Drive setup since you’ll be able to print with a lot more filaments with ease, but doing so will cost you about $50 or more, while going with the Printable upgrade won’t cost you a thing.
I hope this information was useful!
Have a great day!
Check out our recommended products section

We created a recommended products section that will allow you to remove the guesswork and reduce the time spent researching what printer, filament, or upgrades to get, since we know that this can be a very daunting task and which generally leads to a lot of confusion.
We have selected just a handful of 3D printers that we consider to be good for beginners as well as intermediates, and even experts, making the decision easier, and the filaments, as well as the upgrades listed, were all tested by us and carefully selected, so you know that whichever one you choose will work as intended.
Error processing API data.