PETG is one of the most used polymers in 3D printing surpassed only by PLA. It is a modified version of the plastic that is used in soda bottles, for example. The modification makes it more suitable for 3D printers as it lowers its melting temperature and makes it easier to extrude. Compared to PLA, PETG is tougher but softer. Some filaments also have varying opacities and can achieve good levels of transparency which can be good not only for aesthetic reasons but for projects that incorporate lights in them. It also has a higher working temperature range, and it is more suitable for outdoor conditions.
Now that we know the advantages of using PETG, let’s find out how to tune the printer’s settings in order to achieve the best results possible!
For printing with PETG, the be temperature should be set to 70+ºC, whereas the printing temperature should be between 220ºC-240ºC. It is important to turn off the fan for the initial layers and set the printing speed between 30 and 500mm/s. With PETG you should watch out for stringing, bed adhesion, and layer separation or delamination, meaning that retraction settings are very important.
I’ll go over each one of the settings in greater detail and discuss how to fine-tune them. Let’s get started!
The issues with PETG
PETG can get really stringy but it’s only a matter of having retractions well-calibrated or quickly blowing the finished models with a heat gun to remove the thin hairs of plastic. Bed adhesion is also a concern because for some users PETG doesn’t stick well enough and for others, it sticks too well and it makes removing the model from the bed a pain. Finally, there is poor layer bonding that can give some trouble, but it can usually also be managed in the slicer
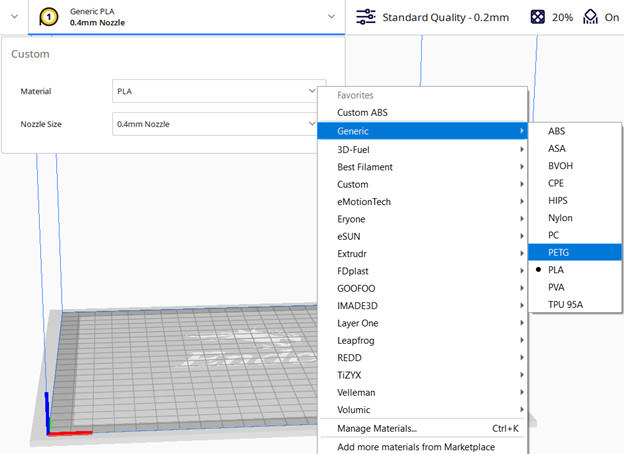
Enable Cura’s default PETG profile (Use it as a starting point)
Cura has a lot of profiles for known brands built-in, so it is a clever idea to use them as a starting point and do small tweaks from there. If the brand isn’t listed, you can start with a generic PETG profile.

Layer Height
Layer height has a significant effect on print time, detail, and strength. The higher the layer height, the shorter the print time, but the less detail and strength. For PETG it is recommended to choose a thin layer to avoid delamination.
According to one study, the bigger the ratio of layer height to nozzle size, the smaller the gap between layers and the better the strength. Therefore, if you need a larger layer, it is advisable to use a larger nozzle. It is possible to emulate a larger nozzle by changing the extrusion width, but it is probably best not to exceed 125 – 150% of the actual nozzle size. (Example: 0.6mm for 0.4mm nozzle).
More info on this topic in this article of ours
Fine Tuning
Print changing only layer height slightly and check the results until you find the perfect layer height for your specific project.
Ideal PETG Layer Height:
- For Detail: 25% of nozzle size or extrusion width (0.1 mm for 0.4 mm nozzle)
- Overall best layer height: 25% – 40% of nozzle size or extrusion width (0.15 mm for 0.4 mm nozzle)
- Quick Prints/prototyping: 50% – 80% of nozzle size or extrusion width (0.2 – 0.3 mm for 0.4 mm nozzle)
Printing Temperature
Printing temperature for PETG isn’t as forgiving as it is for PLA. If not set right, you’ll either get really stringy models with poor detail or serious delamination. The higher the printing temperature, the higher the layer adhesion but the lower the detail.
Fine Tuning
Tuning the temperature can be done printing a temperature calibration tower and changing the extrusion temperature after a fixed distance. Once the print is finished, you’ll be able to clearly see the range in which your filament has the best layer adhesion and detail.
Ideal PETG Printing Temperature: 220 – 240 ºC
There’s a good video on this subject!
Bed Temperature
PETG is known for sticking too well to some surfaces but also poorly if the bed temperature isn’t set right. With glass beds, the part can sometimes come off with chunks of the bed stuck to it. A good release agent such as glue stick is vital in these circumstances.
A study shows that a slightly higher bed temperature than the glass transition temperature of the filament greatly improves adhesion.
Unlike substances such as water, polymers have an additional characteristic temperature, the glass transition temperature. When the polymer is heated above this threshold, its physical properties change from brittle and hard to ductile and tough. The glass temperature of PETG is around 80ºC. Therefore, if your machine can reach this temperature, it is strongly recommended that you set it to at least 70ºC or higher. A more pronounced elephant foot is to be expected, but this can be compensated for in the slicer or in the model itself by adding a chamfer to the underside.
Fine Tuning
Start by having the bed set to at least 70ºC and go higher in 5ºC increments if the print fails. Beware that going too high may ruin your bed because the model sticks too well and removes part of the coating or even chunks of the bed itself.
Ideal PETG Bed Temperature: 70ºC – 85ºC
Print Speed
Print speed for PETG is similar to print speed for PLA though going slower may yield better results. Default CURA settings should be fine. From 30 to 50 mm/s is a sensible range. Some sources suggest that cranking up your travel speeds may improve stringing. If your printer can handle 120+ mm/s it’s worth giving it a try.
Fine Tuning
You can fine-tune your speed printing the same part a few times with varying speeds.
Ideal PETG Speed Settings:
- Print Speed: 30 – 50 mm/s
- Initial layer print speed: 20 – 30 mm/s
- Infill Speed: 40 – 60 mm/s
- Travel Speed: 100+ mm/s depending on the printer
Retraction
PETG can be quite stringy because it prints hot and does not use much cooling, but with proper retracts and some other options enabled, you can get impressive results.
A stringing test can help to adjust the retraction. First, use a retraction distance of 3mm if you have a direct drive extruder and 6mm if you have a Bowden set up. A retraction speed of 25mm/s in either configuration would be a good starting estimate or try slower. Cura’s stock settings usually work well.
What is Combing & what setting to use?
Combing turns off retraction and modifies travel moves to go over the infill to deposit any oozing plastic. It may be useful to set it to “Within infill”
Fine Tuning
You can fine-tune your speed printing the same part a few times with varying retraction speeds and distances.
Ideal PETG Retraction Settings:
- Retraction Distance: 3 mm for direct drive or 6 mm for Bowden
- Retraction Speed: 25 mm/s
- Combing: ON and set to “Within Infill“
Bed Adhesion
As mentioned in the bed temperature section, if the temperature is set higher than the glass transition temperature of the filament, the adhesion strength will be significantly improved.
Brims are a single layer thick border that increases contact with the bed. Their use is particularly useful in models that do not have a good foundation for sticking to the bed. The skirt is the same, but it never comes into contact with the model. The skirt only acts as a primer for the nozzle, so it is not very effective at adhering layers.
Rafts behave like a brim but consist of at least two or three layers underneath the entire model. It also helps to compensate for the unevenness of the bed. Glue stick and hairspray are useful not only when the print is not stuck, but also when the print is firmly stuck.
Ideal PETG Bed Adhesion Settings:
- Bed Temperature: 70+ºC
- Bed Adhesion Type: PEI sheets or coated glass
- Brim Width: At least 10 mm
- Products that help with adhesion: Glue Stick, Hairspray
Print Cooling
To avoid delamination and warping, do not use cooling with PETG. The first best guess for strong parts is to turn off the cooling of the parts completely, except for bridging. For crisp details and less stringing you can use 100% fan speeds after the first two or three layers have been laid down
Fine Tuning
Ideal PETG Cooling Settings:
- Initial Layer fan speed: off
- Fan speed: 0 – 100% depending on whether you are aiming for detail or strength
- Bed Adhesion Type: PEI sheets or coated glass
- Brim Width: At least 10 mm
Do you need an Enclosure for printing PETG?
Printing with an enclosure isn’t strictly necessary for PETG but in cold rooms, they can be useful.
Summary: Ideal Cura Settings/Profile for printing PETG
- Layer Height: 25% – 40% of nozzle size or extrusion width (0.15 mm for 0.4 mm nozzle)
- Printing Temperature: 220 – 240 ºC
- Bed Temperature: 70+ºC
- Bed Adhesion type: Skirt
- Retraction Distance: 3 mm for direct drive or 6 mm for Bowden
- Retraction Speed: 25 mm/s
- Combing: ON and set to “Within Infill“
- Print Speed: 30 – 50 mm/s
- Travel Speed: 100+ mm/s depending on the printer
- Fan Speed Initial Layers: off
- Fan Speed rest of the print: 0 – 100% depending on whether you are aiming for detail or strength
Error processing API data.
