Printing a detailed model on a 3d printer can take a lot of time: depending on your own printer and your model’s requirements, a single print can take more than 24 hours. So, why is it taking so long? What’s holding this technology from making models in minutes? And what can you do to speed up your prints?
In this article, I will go over these questions in detail in the hopes that they will be of use for your future endeavors.
3D printers work assembling layer over layer of material and so they have physical limitations over how fast these layers can be deposited on the current product. Filament-based printers need to deposit their material inch by inch with mechanical contraptions, which tend to make them noticeably slower than some of the resin-based printers for larger printings, as resin base printers rely on light and some can print one whole layer at a time.
There are more factors to keep in mind when contrasting these technologies. However, there are a few things you can do in order to speed up the process.
FDM vs Resin printers
While other methods of construction can take minutes to make a piece, the layer-by-layer method the 3d printers use makes them inherently slower due to the physical limitations inherent to the technology, both for Fused Deposition Modeling (FDM) and for Resin-Based printers.
FDM printers (fused deposition modeling) rely on thermoplastic material which is heated up, extruded, and deposited on the current model through a nozzle, which is moved with precision through a set of motorized parts.
Resin-based printers use UV light to cure a pool of photopolymer material and create solid objects. There are also different technologies for resin printers: Stereolithography uses a single laser that covers a small area drawing the layer analogous to FDM printers, whereas digital light processing (DLP) and light crystal display (LCD) use projectors and backlit LCD screens to provide the source of UV light.
Explaining in detail all the differences with these techniques and when and where it’s better to use one over the other deserves its own article, but for our current topic, the gist is this:
FDM printers need to move heavy mechanical parts (motors, nuzzles, extruder gears, etc.) with incredible precision. In order to move and stop the mechanism, it requires a lot of energy, but even if some of the parts could go any faster (like the motors) it usually results in heavy vibrations that would compromise the results. Also, depending on the material of the filament you are using, it may require more time to melt, deposit, and solidify.
On the other hand, SLA printers are faster than their FDM counterparts because the laser moves more swiftly than the stepper motors. LCD and DPL printers are even faster, printing whole layers at a time. This becomes increasingly noticeable on larger or more finely defined pieces because each layer takes roughly the same amount of time.
It’s also worth mentioning that after the model is finished, the residual resin needs to be manually cleaned from the surface of the final piece, leading to additional time and effort.
In addition to the mechanical aspects of the printers themselves, the software also plays its part when it comes to the speed of your printings. The slicer program settings can mean the difference between a 1 hour and a 3-hour print, and this is something you can work on to speed up the process for the average desktop 3d printer while being aware of the tradeoffs you take for your time.
How to increase the speed of a 3D printer
A lot can be done to increase speed from the software and we are going to cover the main settings to do so. The rest of the article will assume that we are dealing with an FDM printer (unless stated otherwise) since they are by and large the most popular ones.
Print Speed
In FDM models, the print speed defines the speed (in mm/s) at which the extruder moves. This setting can be modified on all slicers, and it is one of the main parameters that lead to lower printing times. Nonetheless, there are mechanical limitations in every printer, meaning that you cant increase your printing speed indefinitely without sacrificing the overall quality of the resulting piece. There are other limitations, such as the rate at which your extruder can melt the plastic. Most printers work at around 50 mm/s by default, but depending on the specifics, they can get up to 750 mm/s or even higher. It is also worth mentioning that printers can work at different speeds depending on which part of the model the printer is currently printing.
As a reference, these are some things to keep in mind that are related to the printing speed:
- Increasing the outer wall speed may compromise the surface quality, meaning that it is only recommended when the overall look of the model is of little importance.
- Increasing the velocity on the inner walls and the infill speed may affect the strength and durability of the piece; if that’s of little concern speeding this parameter is a possibility .
- Top/bottom speed is the speed at which the top and bottom layers are printed; compromising these layers may be troublesome, so slower speeds are recommended to increase the reliability of closure of this layers.
- The support infill speed determines the speed at which supports are printed. Because support structures usually don’t need high quality, higher values might be a good idea to speed up the process.
- And support interface speed is the speed at which support roofs and bottoms are printed. Since these layers might affect the quality of the surface in contact with them, it is recommended to use conservative parameters.
Travel Speed
Travel speed affects how fast the head moves when it’s not extruding filament. Increasing it can save a lot of time, but it may result in problems like layer shifting, which can ruin the entire print. The best way to find the optimal travel speed for your machine is to find your manufacturers information and more importantly, like pretty much every setting on this list, play around with the settings for some test prints, raising it slowly until you find the right speed that won’t compromise your projects. Loose belts tend to be the main reason for layer shifts, so make sure to tighten them on a regular basis.

Retraction Speed
In FDM machines, this affects how fast the printer pulls the filament before it starts moving again. If left too slow, it will result in stringing, but if it is set too fast it may cause filament grinding which causes damage to your extruder and filament loss, as well as other problems, so running some test printing is advisable.
Reducing Infill
Infill is what’s inside the inner walls of the printed model. Slicers use different patterns to fill the volume of the 3d models and different patterns lead to different tensile properties. Reducing the infill percentage leads to faster prints, less filament consumption, and less resistant pieces.
This parameter can go anywhere from 0% (which implies there’s nothing between the walls of the model) to 100% (the walls are completely filled with material). It is worth mentioning that the marginal benefit of increasing this setting above 30% is almost always not worth the extra time.
For LCD or DPL printers which print whole layers in each iteration, infill doesn’t really impact the time it takes to make the piece, but for FDM and SLA printers this value is one of the main drivers of printing times and filament consumption.
Reduce the number of shells/walls
The shells are the number of layers that comprise the contour of the print. Increasing them will make the outer wall thicker and make your 3d print stronger. If you also plan on sanding the print to make it look nicer, it is always a good idea to throw in a couple of extra walls.
Increase the layer height
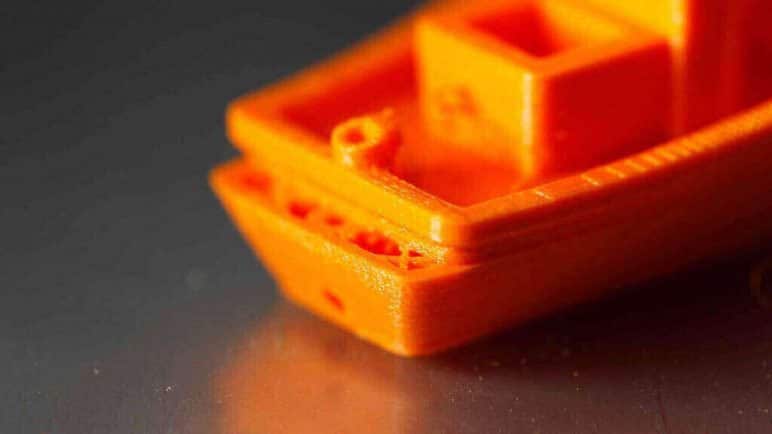
The layer height defines how small each layer is on the Y-axis and it is the main determinant of the model’s detail precision and overall looks. However it is one of the main drivers of the time it takes to print anything. If the finish on a piece is of little importance or if it’s big enough, choosing a higher layer height is a handy trick to reduce the time it takes to print anything.
A high-quality print can take values of 0.1 mm or even lower. However, it has a 1-1 inverse relationship with printing times: reducing the layer height in half will double the printing time.
Minimize the use of supports
In FDM each layer must be deposited on top of something, be it the buildplate surface or another layer of filament. If the model has sections in which some layers would begin printing on thin air, the whole process would fail.
Supports can take a lot of time to make and sometimes are unavoidable, but you might be surprised at how much you can achieve with a few tricks: rotating and adjusting the model to allow it to be printed without the need for support, or just reducing the amount of support needed can reduce the amount of time significantly. As a rule of thumb, try to rotate the model in order to minimize the surface with angles of more than 45 degrees.
Adaptive layers
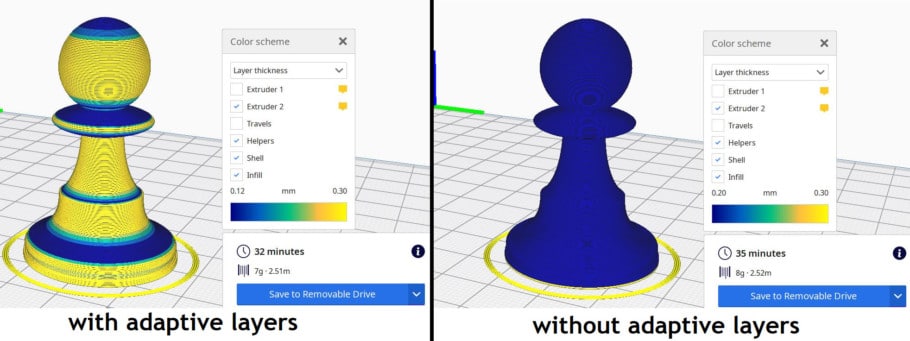
In a nutshell, adaptive layers allow printing with variable layer heights, allowing your slicer to automatically decrease it whenever finer details are required or increase it whenever a section’s shape allows it. Printing with this setting allows you to speed up the process without sacrificing too much in quality; however it does have its limitations: if you need a piece with high details all over or if you try to print two different objects at the same time, adaptive layers may be harmful to the printing as a whole. You can read more about adaptive layers here.

Speed of 3D printers today
In today’s 3D printing market, the vast majority of printers print at a speed of around 40-50 mm/s, and more refined models can get up to 120-150 mm/s; however, there are already models that can get to higher velocities: some Voron printers have reached up to 1000 mm/s! (but it’s still rough, to say the least). The market for 3D printers is constantly evolving at very high rates and we can expect future breakthroughs in technology that will allow for faster, more reliable prints.
Conclusion
There’s a lot to take into account when calculating the printing times of our pieces. Not only is the printing technology and the machine itself important, but also the configuration that we choose on our preferred slicer. These depend not only on the shape and volume of a model but also on the desired aesthetic details and the physical requirements that we need.
The rate at which hobbyist printers improve is astounding and it might even come a day when we won’t have to know anything about the proper configuration of a print. In the meantime, we need to keep playing with the settings in order to shave an extra minute without compromising the quality of a print. For some of us, this is one of the most entertaining and interesting aspects of this profession!
Check out our recommended products section

We created a recommended products section that will allow you to remove the guesswork and reduce the time spent researching what printer, filament, or upgrades to get, since we know that this can be a very daunting task and which generally leads to a lot of confusion.
We have selected just a handful of 3D printers that we consider to be good for beginners as well as intermediates, and even experts, making the decision easier, and the filaments, as well as the upgrades listed, were all tested by us and carefully selected, so you know that whichever one you choose will work as intended.
Error processing API data.
