3D printing isn’t particularly a speedy process: Some small-ish models can take what feels like an eternity to print (I just printed a model that took 37 hours). But, is there a way to speed up the process, especially without a reduction in print quality?
In this article, I will be going over the different settings you can adjust in your Slicer to significantly reduce the time it takes for a print to finish, how to maintain print quality (somewhat), as well as a couple different tips & tricks to make it all happen.
So, without any further ado, let’s get started!
Speed vs Quality

The machine’s ability to handle a given speed will be an important factor to consider when evaluating how speed affects printing quality.
The design and the material from which the machines are made could affect quality at high speeds. This is because fast movements from the extruder could generate significant vibrations.
The filament has its limitations too since it needs a specific temperature to get melted and, if the machine moves too fast, this can limit the flow rate due to the machine not being able to melt filament at that rate.
In addition, if the printer is going too fast, the filament may not have the time to create a strong bond resulting in weak layer adhesion. Here you have an extended article on the topic.
Increasing the nozzle size could yield significantly faster print times but, again, this comes at the cost of quality.
Generally speaking, the faster the print, the lower the quality.
Slicer settings that affect print time
A slicer is the computer software responsible for converting a model in STL format into printer commands in g-code format.
Almost all of these apps allow you to control several parameters, such as infill and perimeters features, layer width & height, speed, etc., and all of them can have a great impact on printing speed.
Let’s see the best way of reducing printing times by trying to affect the quality of the print as little as possible:
Number of Shells (Wall Line Count)

The shell (or perimeter) makes up the exterior of 3D printed parts and can be categorized into two sections: the walls, and the top and bottom.
When adjusting the wall thickness, you are automatically setting the number of perimeters. For example, setting the wall thickness to 1.2mm means that the printer will print a total of three perimeters (shown as Wall Line Count in Cura) since each perimeter is 0.4mm in thickness.
Reducing the number of perimeters means that the printing path becomes shorter and the amount of extruded material is reduced, thus we get faster print times.
In short, reducing the number of perimeters/shells results in faster prints.
Infill Density

The infill makes up the inner volume of the models, and one of its settings we can adjust is the density, which represents how much, or how little, material is going to be making up the inner part of the model, and it can go from 0%, meaning completely hollow, to 100%, meaning completely solid.
The denser the piece, the greater the amount of material that has to be extruded, and the longer it’s going to take your printer to finish the print.
Therefore, if you want to print faster, you should decrease the infill density, but always keep in mind that this could impact the print’s strength.
So, in short; Lowering the infill density to about 10% could save you anywhere from minutes to a couple of hours per print.
Gradual Infill Steps
There is one way to avoid reducing infill density throughout the entire print, while at the same time, mitigating the strength loss.
When using a gradual infill you will obtain a density gradient throughout the entire model, and this will reduce the amount of material used by starting with a low-density percentage at the bottom layers and gradually increasing it near top layers.

You can adjust two different settings: Gradual Infill Steps, which represents the number of times the infill gets reduced by half, and the Height, which controls the height at which the infill density gets reduced.
How much time this setting can save you will depend on the model itself, so enable the setting and adjust the two parameters, then slice the model and compare the estimated print time to the one without Gradual infill steps.
Infill Pattern
The infill pattern is the shape or design used for printing the infill, and it also has an effect on printing time. Many different infill patterns are available in the slicer settings (some of them depend on the software you are using) and each of them provides the model with different characteristics (mostly how strong the model is going to be).

Generally, the “Lines” infill pattern is the fastest one, followed by “zig-zag”, due to the fact that they are simpler to create, but this also depends on the shape of the model and other factors.
Generally speaking, you should select a pattern that works best for the specific model you’re creating because it can make it a lot stronger, but you may want to try out different ones to find which one of them will reduce the amount of time it takes to finish the model.
Print Speed & Travel Speed
Printing speed controls how fast the nozzle moves across the build plate while printing. If you set this speed extremely high, you could experiment ringing or even under extrusion issues. You can try setting a baseline speed and then increase it gradually until you see some defects on the surface.

On the other hand, travel speed is how fast the nozzle moves while it is not extruding the filament. Setting this speed too high can lead to significant vibrations and could cause the nozzle to collide with another part of the print while moving.
Print speed settings allow controlling each part (infill, walls, top, and bottom) speed separately.
You can increase the infill speed dramatically without affecting quality. Shells/walls will need some more testing but with most printers, you can get up to 60mm/s without any important loss in quality (some printers can print at 200mm/s without any loss in quality).
Acceleration & Jerk
Acceleration and jerk are values established in the machine’s firmware, they are not written in the G-code and define in more detail how the movements are executed.

The Jerk setting represents the maximum instantaneous velocity change at which a print head moves from a still position: The higher the setting, the faster it will move off from a stable position, the lower the setting, the slower it will move off from a stable position.
For example, when the print head is still, it tells the printer to go instantaneously from 0 mm/s to the set jerk value ignoring the acceleration parameter. It also works both ways, since it will also control the speed at which the print head will slow down until it reaches 0 mm/s.
If the jerk value is high, it will take less time to reach the maximum speed or to stop, reducing print time (as well as print quality since these rapid velocity changes can introduce vibrations).
The Acceleration setting represents how fast the print head is allowed to speed up; the higher the setting, the quicker the print head will get to its maximum speed, the lower the setting, the slower the print head will get to its maximum speed. Increasing the acceleration will reduce printing time if the printing head has enough distance to travel.
Using the following calculator, you can input your acceleration settings, distance/length of axis and the desired maximum speed and you will see in how much time your printer will hit that desired speed.
Support settings
Supports are a common feature used in 3D printing since, while printing, each layer needs to be supported by the layer beneath it. Sometimes the extruder needs to deposit material at a point where there is no material underneath, and this is where supports come in.
Now, printing supports is extremely time consuming, which is why, if your goal is to speed up the printing process, you should do whatever it takes to print as little support material as possible.
This can be done by lowering the extrusion temperature, improving layer cooling, reducing the flow rate and reducing printing speed, but what I’ve found to work the best is to adjust the orientation of the print in such a way that reduces the amount of support material needed, and to then increase the angle at which the Slicer starts introducing supports (in Cura it’s at 45-degrees by default).

To find out what the maximum angle is that your printer can comfortably print at without the need of supports, you can print this overhang & bridging test and see at which point it starts to fail. If your printer can comfortably print at a 60-degree angle but starts to fail at 65, enable supports at 65-degrees.
Another way of printing faster and also reducing the overall material usage is by reducing the support infill density.
To learn more about supports and optimizing their use, check out this article we wrote on that specific topic.
Layer Height
Layer height is the distance between the nozzle and the previous layer of extruded material. This parameter is related to the level of resolution that the model will have: The lower the layer height, the higher the level of detail, and vice versa.

In terms of printing speed, thicker layers means that fewer layers will be required to achieve the same height, so this will result in faster prints.
On the other hand, the more you increase the layer height, the lower the resolution you will get and, in addition to this, using thicker layers could also have a negative impact on the strength of the model since there’s much less surface contact area between the layers.
Generally speaking, a good layer height in terms of quality, speed, and strength, is 0.2 mm.
Line Width (Extrusion Width)
The Line width determines how wide the line that is being printed is going to be. Usually, it’s as wide as the nozzle hole, but you can increase or decrease it by adjusting this setting.
With higher extrusion widths, the pressure inside of the nozzle increases as well to squeeze the material to the sides after it leaves the nozzle, thus, more material gets out of the nozzle at once meaning faster prints.
Of course, you can’t expect to increase the line width to 200% and get the exact same print quality (although very similar at this stage). Generally, lowering the line width a bit increases print quality at the expense of print speed, whereas increasing it too much reduces the print quality but increases the speed.
Tip: Printing in vase mode (Spiralize outer contour in Cura) generally results in somewhat weak prints when using a standard 0.4mm nozzle, but increasing the line width to 200% will, essentially, print the vase with a wall twice as thick, resulting in a much stronger print and without taking any longer to finish.
Bed Adhesion Settings (Don’t use a Brim or a Raft)
Skirts, brims and rafts are designed to aid with bed adhesion (mostly brims and rafts). A skirt is a line of extruded plastic surrounding the model and printed without being in contact with the print itself. It is used to prime the extruder and obtain a smooth flow before starting to print the piece.

A brim is a layer of material surrounding the model, just like a skirt, but which actually comes into contact with the edges of the model. This one helps with bed adhesion and prevents warping.
A Raft is a printed surface used as a base to print the 3D model on. It helps to guarantee that the first layer is printed well and that it won’t detach from the build surface.
As you can imagine, using a raft will add a lot of time to the printing process and also consume more material. I would highly suggest using a skirt or nothing at all, since the printer usually primes the extruder anyway by printing a line at the side of the bed.
If bed adhesion if a problem, then consider using a brim and increasing the bed temperature slightly above the glass transition temperature of the filament.
Adaptive Layers
Adaptive layers helps to reduce print time a lot without losing much quality and resolution since it uses a variable layer height; this mean the printer will increase an decrease layer height while printing depending on the shape of the model.

In Cura, this feature automatically lowers the layer height when printing curved geometric areas, while areas with less structural changes will be printed with thicker layers.
Depending on the model itself, adaptive layers can save you close to no time up to 15% or even 20%, in some cases.
Other Methods for Increasing print speed
Besides slicer settings, we can resort to other methods in order to increase the speed at which the prints come off out printer.
Use a larger Nozzle (Reduces print quality)
Using a larger diameter nozzle allows you to print wider perimeters, reducing the overall number that are needed.
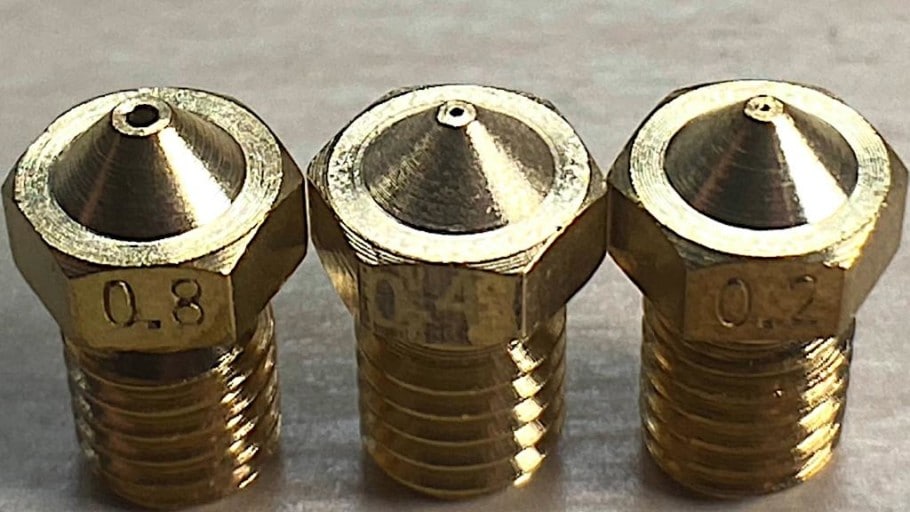
By that same token, a larger diameter nozzle will also allow you to increase the layer height which, as previously discussed, has a direct impact on print speed, although this comes at a clear reduction in print quality.
One additional benefit of printing with a larger nozzle is that, since the layer itself is much wider, there’s a lot more surface contact area, and this directly correlates to a prints’ strength: The wider the nozzle, the wider the line width, and this increased surface contact area results in stronger prints.
Print in Large Batches
If you need to print more than one piece, printing in large batches would be a suitable option.
This reduces the time the printer has to heat up, cool down, the number of times you need to level the bed (automatic bed leveling takes a lot of time also).
The only con to printing large batches is that if there’s a single error/problem, like a print detaching from the build plate, then the entire batch is lost and you need to start it all over again.
Conclusion & Example settings
3D printing is not exactly a fast process. Even a print that is just a few centimeters tall can take several hours to complete.
If you follow this guide, then you should be able to increase printing speed significantly without an extreme reduction in quality.
The following list shows example settings for faster print speeds with standard cheap 3D printer,s such as Ender 3:
- Layer height: 0.28 mm
- Wall Line Count: 2
- Infill: 5% – 10%
- Adaptive Layers: Enabled
- Speed: 60 mm/s
- Initial Layer Speed: 20 mm/s
- Initial Layer Height: 0.2 mm
- Bed adhesion: Skirt
- Line Width: 200%
- Initial Fan speed: 0%
- Fan speed (after the initial layers): 100%
- Support overhang Angle: 60º (Disable supports, if possible).
- Jerk: maximum value of 20 mm/s.
- Acceleration: 400m/s^2
Error processing API data.